T-Shaped Mounting Blocks
Made by eugenpirogoff
Created 1 months ago
Description
A pair of 40mm tall, T-shaped mounting blocks designed to bolt flush against flat surfaces. Both versions feature 4.5mm clearance holes with deep 45-degree countersinks sized for 9mm screw heads.
- Two-Hole Block: Dual mounting points vertically spaced at 10mm and 30mm for rigid anti-rotation fixing.
- One-Hole Block: Single central mounting point at 20mm height.
- Dimensions: 20x20mm main body with a 5x30mm mounting flange.
- Tolerances: 2mm corner rounding on all vertical edges to relieve stress and ease printing.
Images
More like this
Explore more in Workshop & Tools →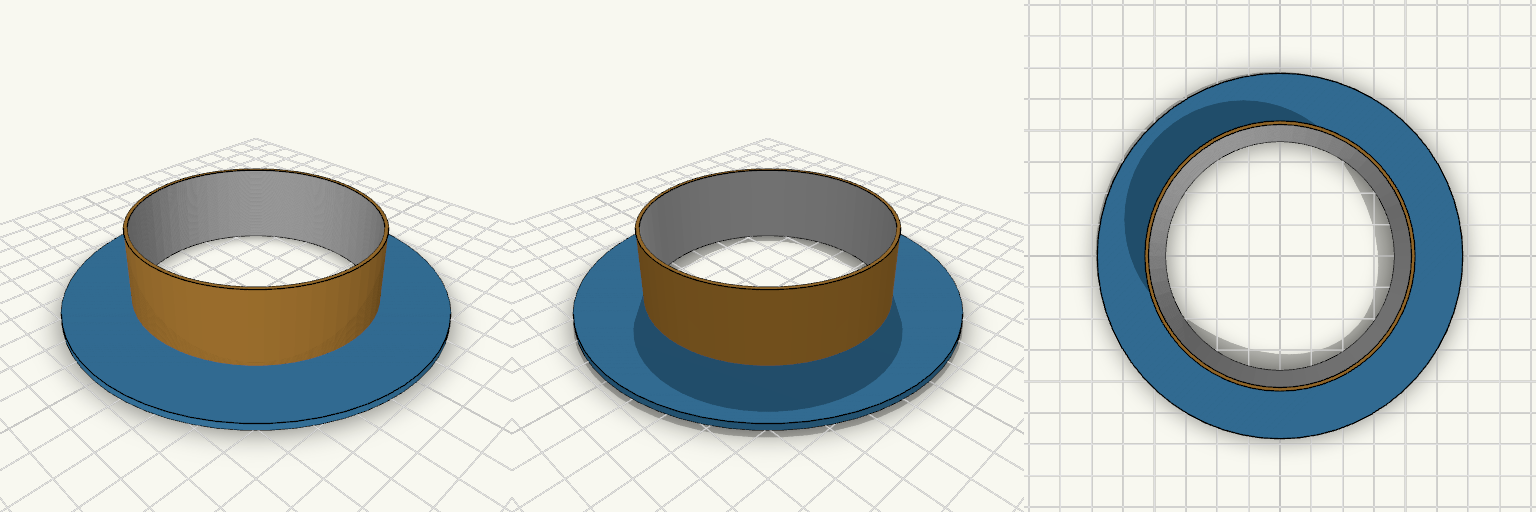
75mm OD Tube with 115mm Flange
A 75 mm OD tube with a 73 mm bore, 25 mm tall, with a thin flange at the base. The flange extends 20 mm out from the tube wall. Tube: 75 mm OD, 73 mm bore (1 mm wall), 25 mm height Flange: 2 mm thick, 115 mm OD, 20 mm overhang past the tube wall Bore runs through the flange and tube Prints flange-down with no supports The 1 mm wall is thin; use a fine nozzle or slicer thin-wall settings
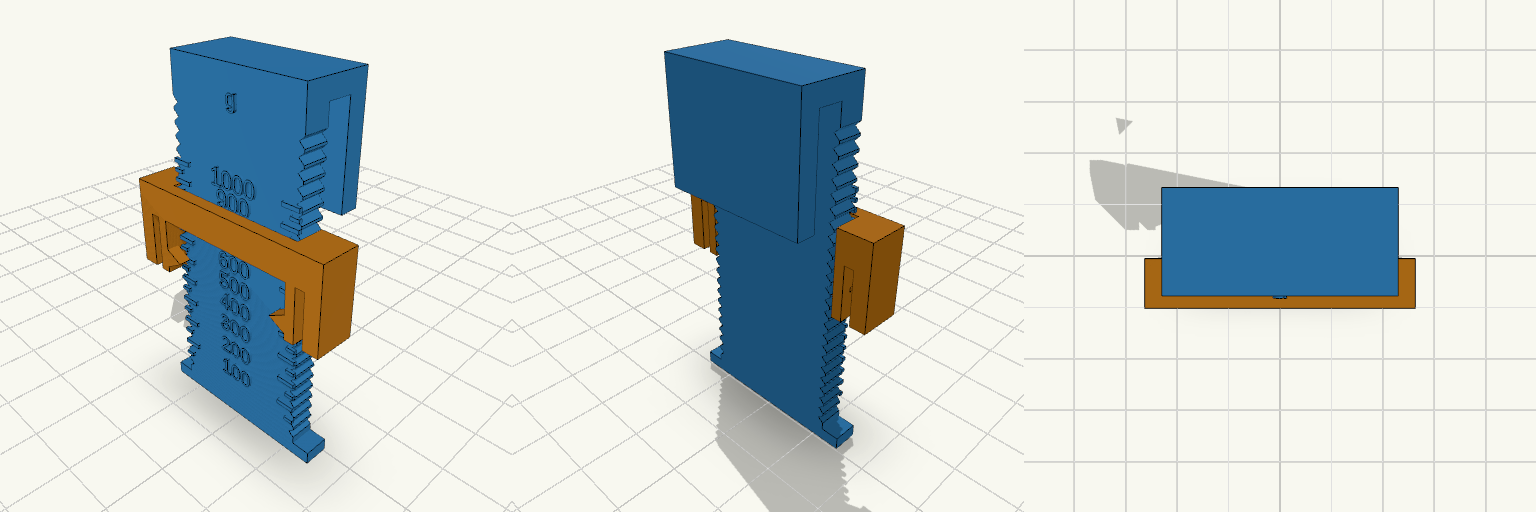
SpoolScope — Filament Remaining Gauge
SpoolScope is a two-part gauge for estimating how much filament remains on a standard spool, made for spools that sit out of easy view in an AMS or on a shelf. The rail hooks over the flange rim; the sliding block rides on it with light detents, so you can push it down until it touches the filament, lift the gauge away and read the result. Raised ticks and numbers plus an unambiguous arrow on the block make the measurement clear without needing line-of-sight while the gauge is in place. Features Two printed parts: a rail with a rim hook, and a detented sliding block. Gram scale from 0 to 1000 g, with ticks every 50 g and numbers every 100 g. Ticks follow filament geometry rather than an even spacing: closer together near full, wider apart near empty. Arrows on the block tip directly toward the scale, and the detents hold the reading after the gauge is lifted off. Hook gap of 4 mm, sized to clear flanges from 2.8 mm to 3.6 mm thick. Dimensions Flange diameter: 200 mm. Hub outer diameter: 95 mm (from a measured Polymaker spool). Full-roll diameter: 170 mm (estimated from a 1 kg PLA roll on a 95 mm hub and a 65.6 mm spool width). Hook gap: 4 mm. Fitting and calibration Sized around Polymaker and Inland 1 kg spools; other brands are worth checking against the hub and flange figures above. The scale can be shifted by a single fixed offset if a first print reads consistently high or low, so a weight check against a known spool is worth doing before trusting the numbers. If the error differs between a full and an empty spool, the hub and full-roll values are the ones to correct. Print notes Both parts are laid out flat on the print plate. The block contacts the filament at its outer edges rather than at the centre, so a reading can sit slightly high; a weight check against a known spool is the best way to confirm the scale.
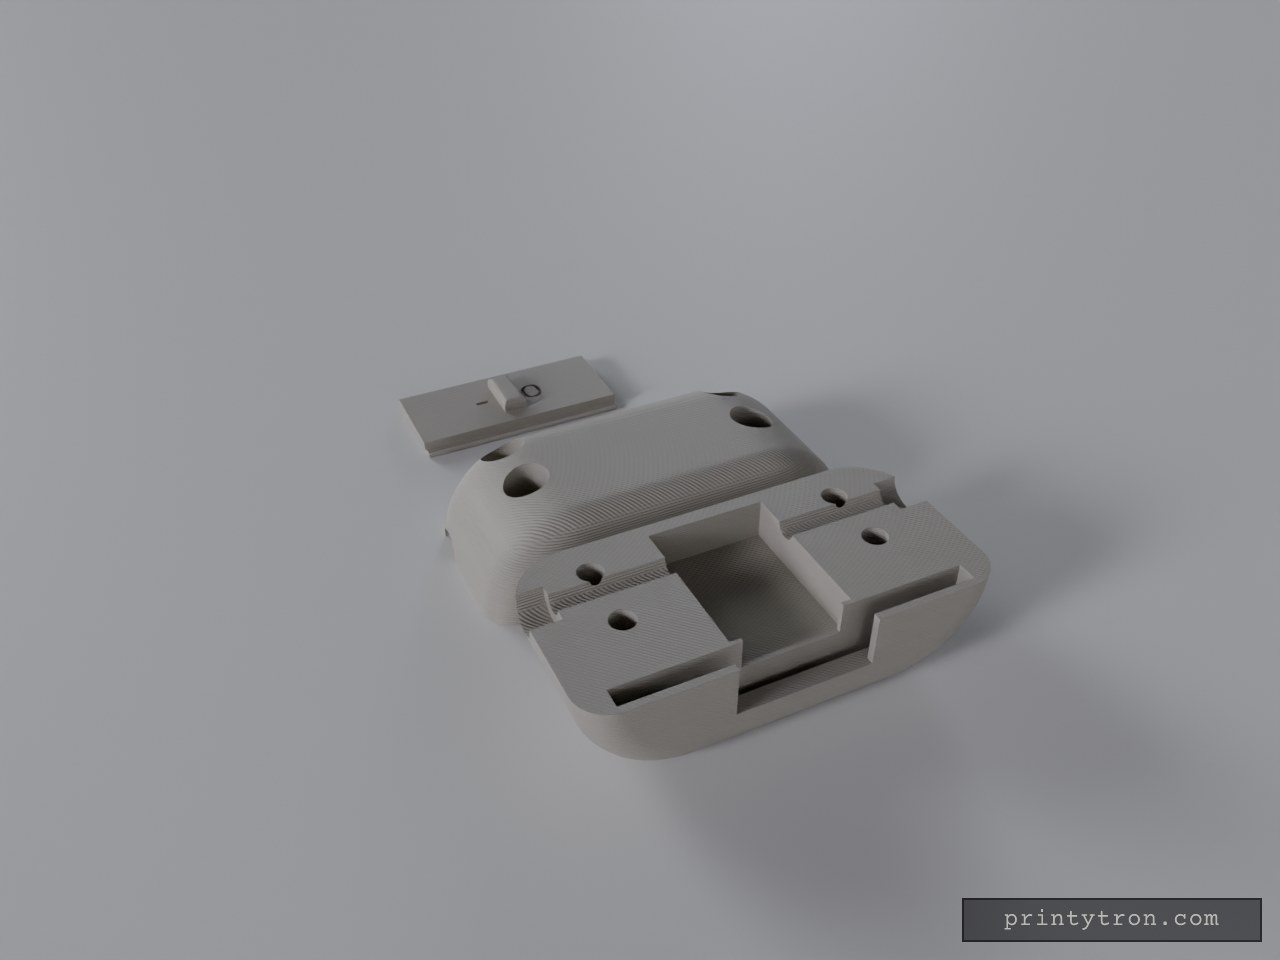
Oval Electrical Switch Housing with Slider
A pebble-shaped housing for a small electrical switch, built as two lengthwise half-ovals plus a separate sliding cover. The front and back halves split along the wire axis, and the seam runs through the middle of both 3 mm wire holes and the switch pocket. Lay the switch and wiring into one half, drop the sliding cover into the half-cut T-track, then close the other half over it like a clamshell. Four M3 screws pass through the back half and thread into M3 nuts seated in the front half from outside, so the seam clamps evenly and the two halves of the track stay aligned instead of catching the cover on a step. The housing is 54 × 27 mm in plan and 26.4 mm tall, with an 8 mm rounding on the bottom edge and 4.5 mm on the top so it reads as a pebble rather than a puck. Inside, the pocket is 15.9 × 11 × 20.2 mm — a 15.3 × 10.4 × 19.8 mm switch plus about 0.5 mm clearance per side. The sliding cover is 32 × 16.4 × 4 mm including its thumb tab and fills the full track width, travelling 14 mm. Its top is closed and trimmed to the housing's oval outline, so the outside reads as one continuous curved form; the 13.1 × 8.2 mm window is a blind recess on the underside with about 1 mm of skin above it. Slide the cover toward +X until the recess lines up with the opening to expose the switch, and back toward −X to close it. A small rectangular thumb tab, 3.6 mm along X and 8.2 mm across, sits at the cover's center and rises about 0.6 mm above the housing surface. Its top edges are rounded at 0.9 mm so it blends into the oval's curve, and its width matches the switch opening. Engraved marks 0.5 mm deep on the cover top indicate state within the exposed middle: "o" sits 4.2 mm on the +X side of the cover center and shows when closed; "-" sits 4.2 mm on the −X side and shows when open. Only one mark is visible at a time because the other slides under the roof. Both wire ports open into a 6 mm round seat, 6 mm long, ready for a wire holder of that size; the channels themselves stay at 3 mm. A roof spans the track from x = ±9 mm out to each end of the oval. It is part of the two housing halves and follows the oval's top curve, covering the track ends so no open slot shows there and closing the small triangular corner gaps. The cover runs under the roof, with its top about 0.2 mm below it; the middle section from x = −9 to +9 mm stays uncovered because the cover needs that clearance to move. The end stops are integrated into the two housing halves: each half carries its share of a stop at both ends of the track, and the stops fill the track's full cross-section, including the wide groove and neck, ending flush with the oval's outer surface. The cover is blocked at both ends of its travel and cannot slide out. To fit or remove the cover, open the halves as you would for the wires and switch. There are no separate loose stops left in the model. Fasteners and seam Four M3 screws, at x = ±17 mm and heights of 5 mm and 14 mm — solid body clear of the switch pocket and the wire channels. Use M3 × 18 mm; M3 × 20 mm also works, but its tip can poke through slightly. Back half (purple): 3.4 mm clearance holes through the wall, with 6.2 mm counterbores so the heads sit 6 mm in from the seam. Front half (blue): 3.4 mm screw holes run from the seam to a flat nut seat 9.8 mm out. The hex pockets are 6.5 mm across the corners and 4.2 mm deep for a standard M3 nut (5.5 mm across the flats). They open through the outer curved surface, so each nut drops in from outside and sits flush. The lower pockets are close to the bottom curve, so check that wall when you print. Print layout The three pieces are arranged side by side on the plate, not overlapping, so each can be exported on its own: Front Half (blue): 54 × 26.4 × 13.5 mm. The current plate keeps it split face up; with no pins on that face it can be flipped to sit split face down and print without supports. Back Half (purple): 54 × 26.4 × 13.5 mm, split face on the bed, so it needs no supports. Sliding Cover (orange): 32 × 16.4 × 4 mm, upright with its flat underside on the bed and the thumb tab on top. The fit has not been tested, so check the slide, the nut pockets and the screw alignment before a long print. Remix hooks Pocket — 15.9 × 11 × 20.2 mm. The first thing to re-cut for your own switch. Hold roughly 0.5 mm clearance per side: tighter grips it, looser lets it rattle. The 15.9 mm runs along X, so keep that orientation if the wires must stay in line with the cover. Split plane — along the wire axis. The seam runs through both 3 mm wire holes and the switch pocket. Moving it off-centre changes how the halves sit and where the wire seats land; keep the four screw holes aligned at x = ±17 mm, heights 5 mm and 14 mm. Screws and nuts — M3, 3.4 mm holes, 6.5 mm external hex pockets. Swap the external hex pockets for heat-set inserts or threaded bosses if you'd rather not handle loose nuts, or step down to M2.5 in the same bosses if 3 mm screws crowd the 27 mm width. Counterbore depth sets how far the heads sit in. Wire seats — 6 mm diameter × 6 mm long, feeding 3 mm channels. Resize these to match your actual wire holder, or turn them into a plain grommet relief if the wiring takes a different route. Sliding cover — 32 × 16.4 × 4 mm. It runs between the integrated stops and carries the blind 13.1 × 8.2 mm recess underneath. Lengthen or shorten the solid and recessed sections to change how far it travels before the switch is exposed; the current travel is 14 mm. Thumb tab — 3.6 × 8.2 mm, about 0.6 mm proud, with 0.9 mm rounded top edges. It must clear the roof ends at x = ±9 mm through the 14 mm travel. Changing its width, its rounding, or the roof span changes that clearance. Roof span — x = ±9 mm to the track ends. This sets how much of the track is covered and how much middle stays open. Raising or lowering the roof changes the cover's clearance and how flush its top sits; widening the exposed middle makes both marks visible at once. Integrated stops. They are cut into both halves at the ends of the track and fill the track cross-section, so changing the cover length means moving them rather than swapping a separate part. Shorten the cover instead if you want to keep the current stop positions. Oval body — 54 × 27 mm in plan, 26.4 mm tall. Stretch the oval along X to fit a deeper switch, and adjust the top and bottom edge roundings to change how soft or blocky it looks. Keep the wire-hole centreline in mind when moving the ends. Layout. Each piece keeps its own print orientation, so you can drop one piece or re-arrange the plate without touching the others. Variants worth trying Replace the "-" and "o" engravings with "OPEN" and "LOCK" lettering, or run a single indicator line across the cover. Add short alignment pegs beside the screws, or a tongue-and-groove along the seam, if the halves don't register well before tightening. Flatten one long side into a mounting tab with a screw hole so the housing can be fixed down. Print the cover in a contrasting colour to one or both halves so the split line and track read clearly.
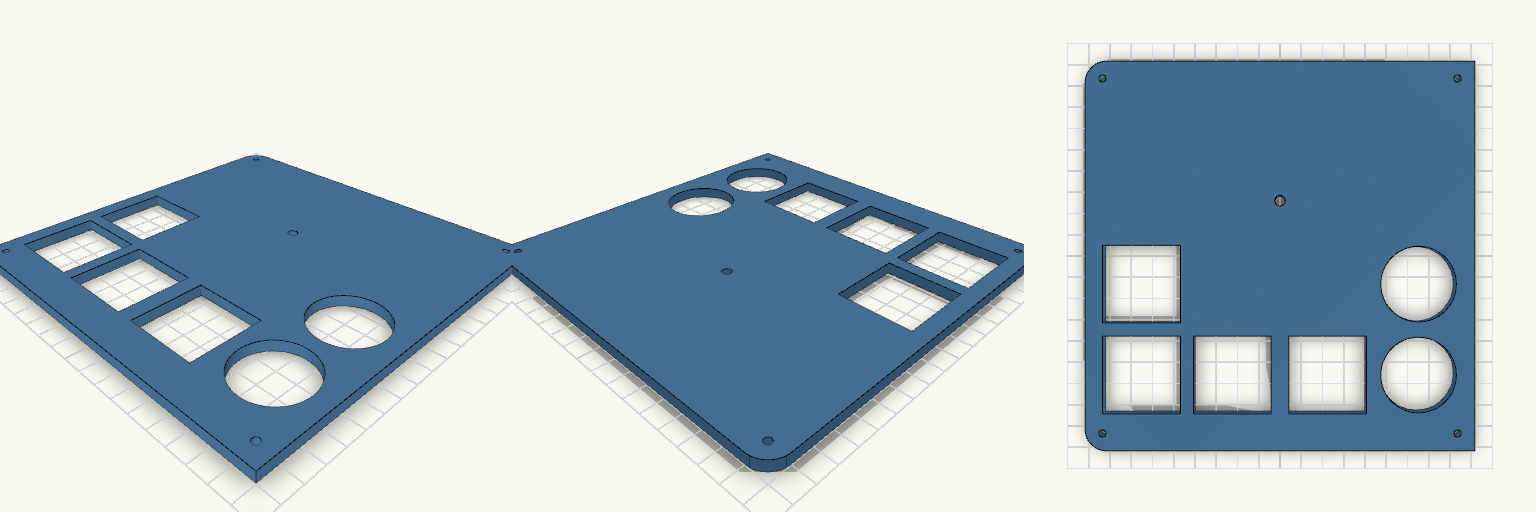
Tapa cuadrada con agujeros mixtos
Tapa de 180×180×5 mm con dos lados redondeados a la izquierda (radio 10 mm), cuatro agujeros M3 en las esquinas y un agujero de 5 mm. Dos agujeros redondos de 35 mm a la derecha y cuatro cuadrados de 36 mm a la izquierda, en la zona inferior. Ideas para remezclar Diámetro de los redondos (35 mm): súbelo o bájalo según la pieza que deba pasar; la pared entre ellos es de 7 mm. Lado cuadrado (36 mm): ajústalo por separado; los centros están a 42 mm. Radio de las esquinas (10 mm): 5 mm para una curva más suave. Agujero de 5 mm: está a 25,5 mm sobre el centro; muévelo para un pasacables o un pulsador. Combina con: una base o caja de 180 mm usando los M3 de las esquinas (3,4 mm, a 8 mm del borde).
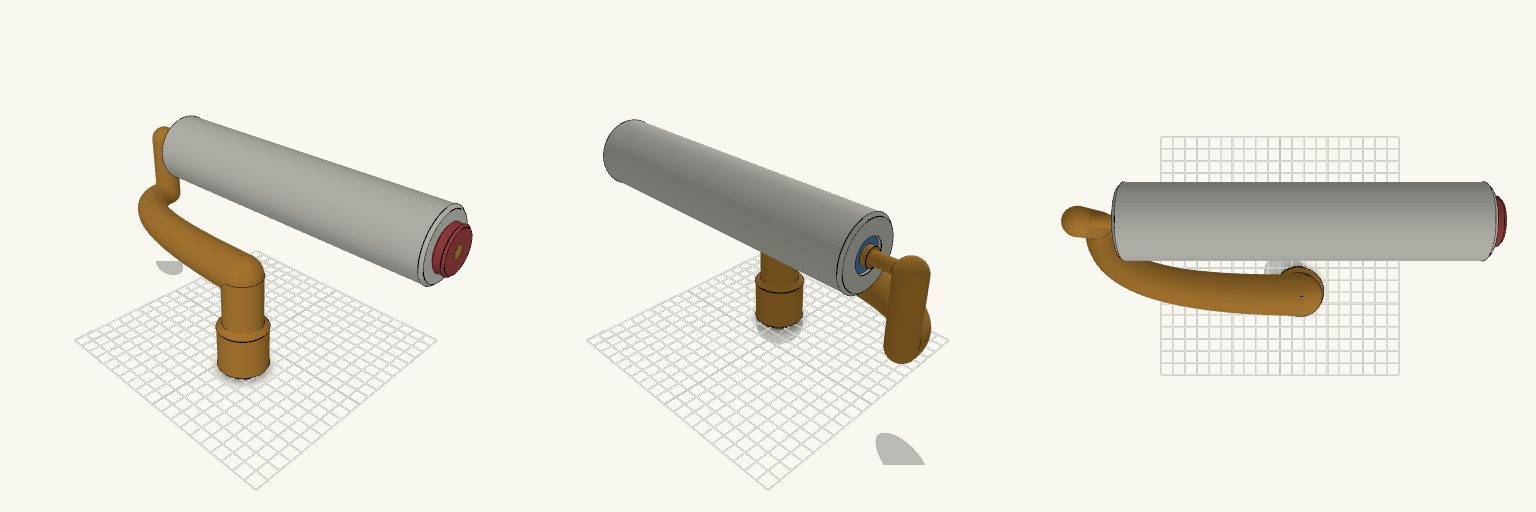
Cantilever Paint Roller Arm for Extension Poles
A screw-on arm that turns a standard extension pole into a paint roller handle, now with a tapered S-curved spine and the roller carried high above it. The threaded socket sits near the middle of the roller but offset to one side, then the arm sweeps back to the fixed end, where a short 20 mm post lifts the 9 mm axle and the one-piece 50 mm cover rides on two 609 bearings, held by a removable red end cap. The offset is deliberate: a socket on the roller's centre line would block the cover from sliding on. The S-curve carries the push back to the axle's fixed end, so pressure lands closer to the middle of the roller than a plain end-mounted jib — and the raised axle keeps the cover well clear of the arm, roughly 76 mm of daylight between the roller's lowest point and the top of the bend, so it spins free and slides on from the open end. The raised S-curve layout The silhouette reads as a paint roller with an arched back: socket beside the roller path, S-shaped arm rising and returning to the axle's fixed end, the post lifting the cover so it hangs above the arch rather than beneath it. That keeps the free end clear so the roller slides on unobstructed. It also means the pole sits beside the roller rather than in line with it; the load travels through the arm to the fixed end, and the short post adds a little extra lever at the axle's root. The 9 mm axle is still the part to watch under hard pushing — a 10 mm axle would stiffen the reach if your roller cage allows it. Parts and fit Pole socket: female 3/4 in ACME-style thread, 5 TPI, 32 mm deep, with a chamfered mouth; test-fit against your own pole before printing the full arm. Roller cover: one continuous smooth 50 mm cylinder, about 232 mm long, with a 24 mm bore that sits on the bearing outer rings; no nap texture. Bearings: two 609 bearings, 9 mm bore (9.3 mm modelled for clearance), 24 mm outer diameter, 7 mm wide. End cap: removable cap at the free end, about 8 mm thick and 32 mm across, holding the cover on the axle. Clearance: the cover sits above the S-bend, with about 76 mm between its lowest point and the top of the arm, so it clears the socket and the bend. Assembly: the arm, cover and end cap print as separate parts; slide the cover on from the free end, then press the end cap in place. Check the bearing fit and end-cap fit on the printed part. Dimensions Roller arm as oriented for printing: 278 × 79 × 136 mm Roller cover: 232 × 50 × 50 mm, one piece End cap: 8 × 32 × 32 mm Axle: 9 mm diameter, cantilevered from its fixed end to the free end, lifted on a 20 mm post Bearings: two 609, 9 mm bore (9.3 mm modelled), 24 mm outer diameter, 7 mm wide Print notes Print the axle lying flat, as oriented, with plenty of walls — it is a long cantilever and will flex under hard pushing. Print a short thread test piece first; thread clearance varies from machine to machine, so check it against your pole before committing to the full arm. Test-fit the bearings on the axle and the cover on the bearing outer rings; check the 24 mm bearing outer diameter against your roller core. Inspect the S-curved arm, the lifting post and their junctions after printing, since that area carries the pushing load. Check that the raised cover clears the arm on your printed part before use. Add a brim if the contact face looks narrow on your plate. Remix ideas Rework the thread for a different pole standard or diameter. Set the axle and cover length for a 4 in or 7 in roller instead of the 9 in this one is drawn around. Add a nap or ribbed texture to the cover surface. Try a 10 mm axle for a stiffer reach above the bend. Change the bearing size or spacing for a different roller core. Replace the bearings with plain bushings or a direct-fit cage. Trim the lifting post height to tune the clearance over the arm.
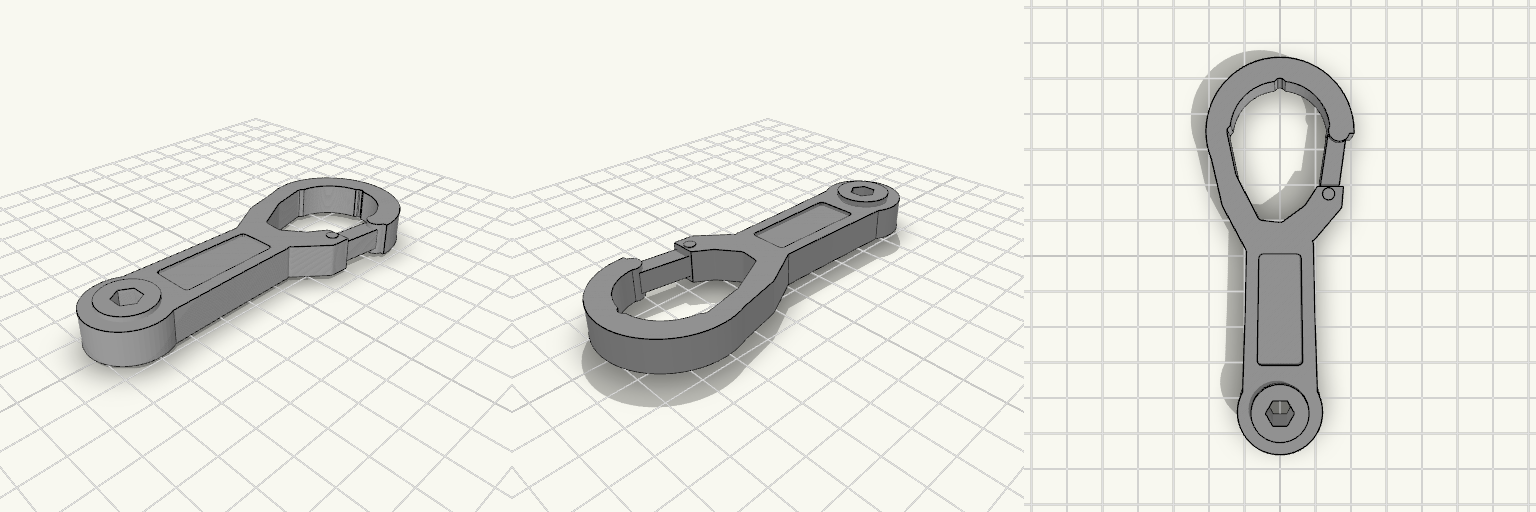
Mini Carabiner Ratchet Tool with Hex Socket
A compact carabiner-shaped ratchet tool that prints as one solid piece, with no separate parts to fit or assemble. The ring head forms the clip end, the body tapers down into a shaft with recessed grip panels on both sides, and a hex socket sits at the working end for driving bits. A gate bar on a hinge pin, a collar and a selector lever complete the tool profile. The whole part measures about 39 × 104.7 × 12.2 mm, so it sits flat on the plate and stays small enough to hang from a belt loop or a pack strap. Ring head at the top for clipping onto a loop or lanyard Tapered shaft with recessed grip panels Hex socket at the tip for standard bits Gate bar, collar and selector lever as part of the same solid Prints as a single fused piece — nothing to glue or snap together Edges are sharp and clean; chamfering the outer edges softens them if you prefer a rounder feel Print it in a tough filament such as PETG or a filled PLA if it will see real use, and add a small brim if the ring end needs more plate adhesion.