3D-printable kitchen & bathroom accessories
Dispensers, holders, covers and stands sized for everyday items. Browse what makers built, or describe the exact accessory you need and Printy makes it.
Need one that fits your exact measurements? Start building →
Newest
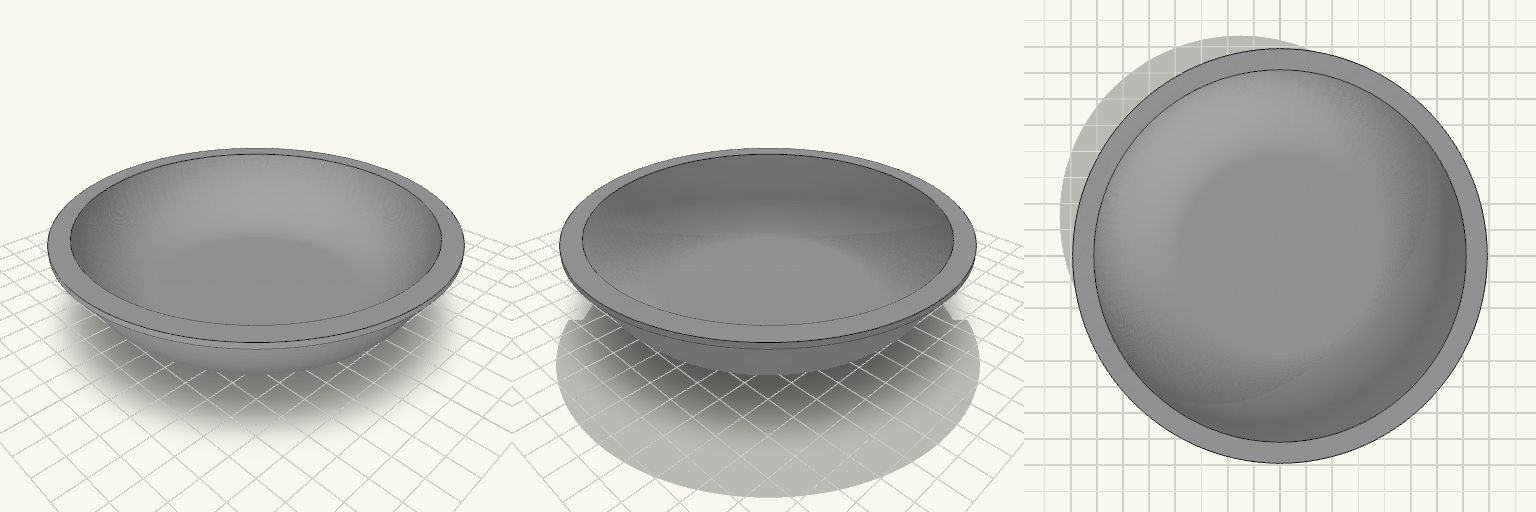
Brim — Flat-Bottom Rounded Bowl
Brim is a shallow serving bowl with a flat 75 mm base that sweeps up in a smooth curve to a wide, flat rim. The flat base keeps it stable on a table and easy to print without supports on the bottom face. Dimensions Outer rim diameter: 138 mm Rim width: 5 mm, flat and horizontal Opening inside the rim: 128 mm Depth: 30 mm Flat bottom diameter: 75 mm Wall thickness: 2 mm throughout Print notes Print rim-up or base-down; base-down is the natural orientation. The steepening curve near the rim may need supports or slow cooling.
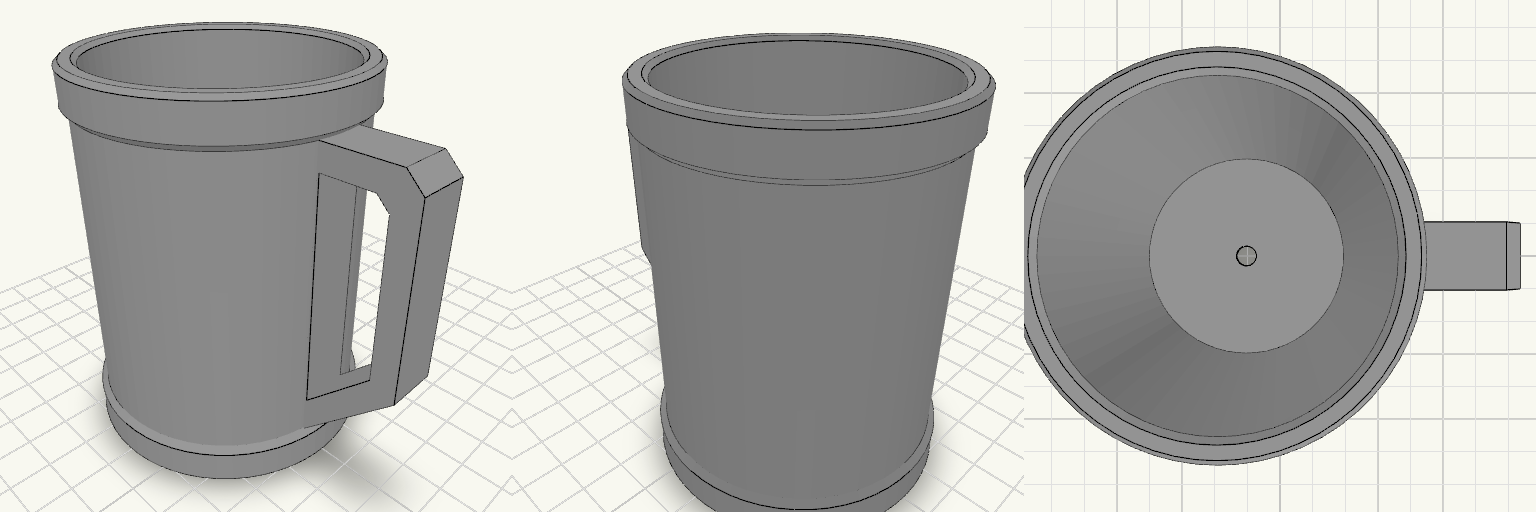
Caneca porta-latas com alça em peça única
Caneca porta-latas em peça única para latas de 269 ml. O corpo cilíndrico tem Ø externo de 64,6 mm e 90 mm de altura, com cavidade reta de Ø 58,6 mm e 87 mm de profundidade útil. A parede tem 3,0 mm e o fundo 3 mm; um furo de Ø 6 mm no centro do fundo alivia o ar, e um chanfro de 1 × 45° na borda interna do topo guia a entrada da lata. Duas faixas salientes de Ø 67,6 mm reforçam o desenho: uma na base, de Z=0 a 10, e outra no topo, de Z=80 a 90, ambas com chanfros de 45°. Entre Z=10 e Z=80 o corpo é liso, para receber adesivo. A alça fica em um dos lados, com 12 mm de largura e avanço até X=54. Ela sobe até Z=80, encostando no início da faixa superior, e mantém topo plano com barra vertical na ponta; a diagonal de 45° fica embaixo. As barras do perfil têm cerca de 6 mm, e as quinas externas e as do furo são chanfradas a 45°. O vão interno acompanha o perfil, com teto em Z=74; o chanfro na quina ajuda a impressão, mas o trecho ainda forma uma ponte e pode pedir suporte. Altura total: 90 mm Pegada na mesa de impressão: 87,8 × 67,6 mm Cavidade: Ø 58,6 mm por 87 mm de profundidade útil Parede de 3,0 mm e fundo de 3 mm Furo de alívio de ar: Ø 6 mm Faixas salientes: Ø 67,6 mm, base de Z=0 a 10 e topo de Z=80 a 90 Alça: 12 mm de largura, até X=54, topo em Z=80, barras de cerca de 6 mm e chanfros de 45° Vão da alça: teto em Z=74, com chanfro na quina; pode pedir suporte sob a ponte
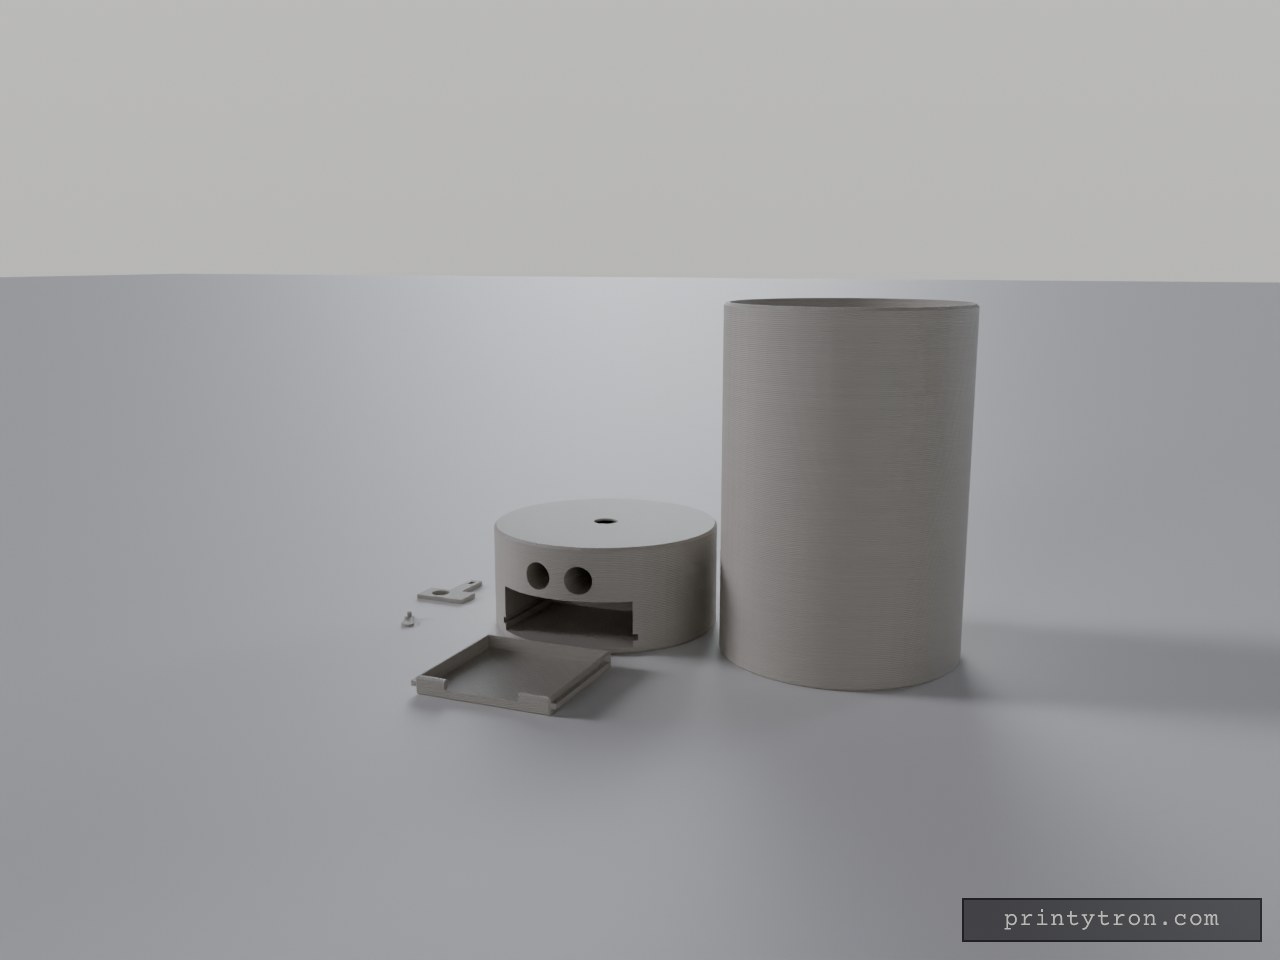
Sentinel Cylinder Candy Dispenser
A candy dispenser with a watchful streak: the body stands as one straight 105 mm cylinder from foot to rim, and two eye holes on the front give it the look of a sentinel standing guard over the opening below. Those eyes are through-holes opening into a pocket for an ultrasonic sensor, so a wave of the hand can trip the servo below the gate slot and slide the gate open, dropping candy into the hand opening below. That opening is a genuine hole cut clean through the front wall, about 63 mm wide and 21 mm tall, sized for an average hand rather than a large one. A retractable catch tray rides on side rails on its floor, just under the outlet, with a low notch at the front so you can scoop the candy out with your fingers. A cone at the floor of the candy cylinder funnels the sweets down to the outlet, and the whole thing stands 200 mm tall — a tall column that holds a serious load of candy while keeping a modest footprint on the counter. All five pieces are laid out separately on the plate, each oriented for printing without supports. The candy cylinder is silk white, the base pink, the catch tray light blue, and the gate slider and servo horn white. The printed parts Base Housing — a round 105 mm pink body, 48 mm tall. The hand opening sits at the front bottom, open through the wall. The two sensor eye holes sit just above it, also cut clean through, so the sensor has a clear line of sight out the front. The servo bay is sized for an SG90: the servo slides in from the back wall, shaft up, with its mounting ears resting in a slot cut into the housing. A round recess above the body lets the shaft boss sit so the horn runs flush under the gate. The wider body leaves room to open the sensor pocket to full size. Candy Cylinder — a 105 mm open cylinder, 152 mm tall, in silk white, with roughly 3 mm walls, flush with the base so the body reads as one uninterrupted column. A wide, shallow cone at its floor feeds the outlet; everything above it is candy storage. Gate Slider — a flat 26.3 × 33.8 × 2.3 mm white plate that slides sideways in a slot across the outlet, just under the candy cylinder floor. A solid bar covers the outlet when closed; a 12 mm hole lines up when open. Its tail has a slot for the servo horn pin, and about 60° of servo sweep moves the gate roughly 13.6 mm — enough to fully open or close the outlet. Servo Horn — a 10.1 × 13.3 × 3.2 mm white horn with a pin that rides in the gate’s tail slot. The servo below the gate slot turns it to shift the gate. Catch Tray — a 64.5 × 57 × 7.5 mm light-blue tray that slides into the hand opening on two side ribs set in matching grooves, and sits directly under the outlet. Its back and side walls are about 1.5 mm thick, the front wall carries a low scoop notch, and the front edge stands about 1.5 mm proud of the housing as a pull tab. The rails are 3 mm wide with about 0.5 mm clearance in the grooves. There is no end stop, so the tray pulls out completely; a small snap bump would add a stopping point. It prints flat and needs no supports. Before you print The servo pocket matches an SG90: about 12.6 mm wide and 23 mm tall, with a mounting-ear slot. The sensor pocket and eye holes are undersized for an HC-SR04. Open those up while keeping the outside dimensions, or plan on a smaller sensor. The wall between the servo bay and the hand opening is thin, about 0.6 mm at final scale. Print the base with extra perimeters. The 152 mm cylinder is a tall, thin-walled tube — print it upright as laid out, and print it slowly. Check that it fits your printer’s height; if not, split it into two stacking rings. The gate slot has only about 1.4 mm of material above it before the cylinder floor, and the wall between the hand opening and the sensor pocket is thin. Print the base with extra top layers and extra perimeters for strength. Keep the gate plate flat on the bed so it slides cleanly through its slot, and keep the tray flat so its side rails and walls stay square. The base and candy cylinder have no locating lip, so glue or tape them together. Test-fit a real SG90, ultrasonic sensor and tray before final assembly. Wire the sensor and servo to the same controller. When the sensor sees a hand, the controller turns the servo to open the gate, waits, then turns it back to close. Remix hooks — cap the 105 mm cylinder with a lid, open the outlet up for faster dispensing, open the sensor pocket to HC-SR04 size now that the round base has the room, widen the hand opening, deepen the catch tray, add a small snap bump to give the tray a stopping point, or add a shallow funnel lip around the outlet for easier loading.
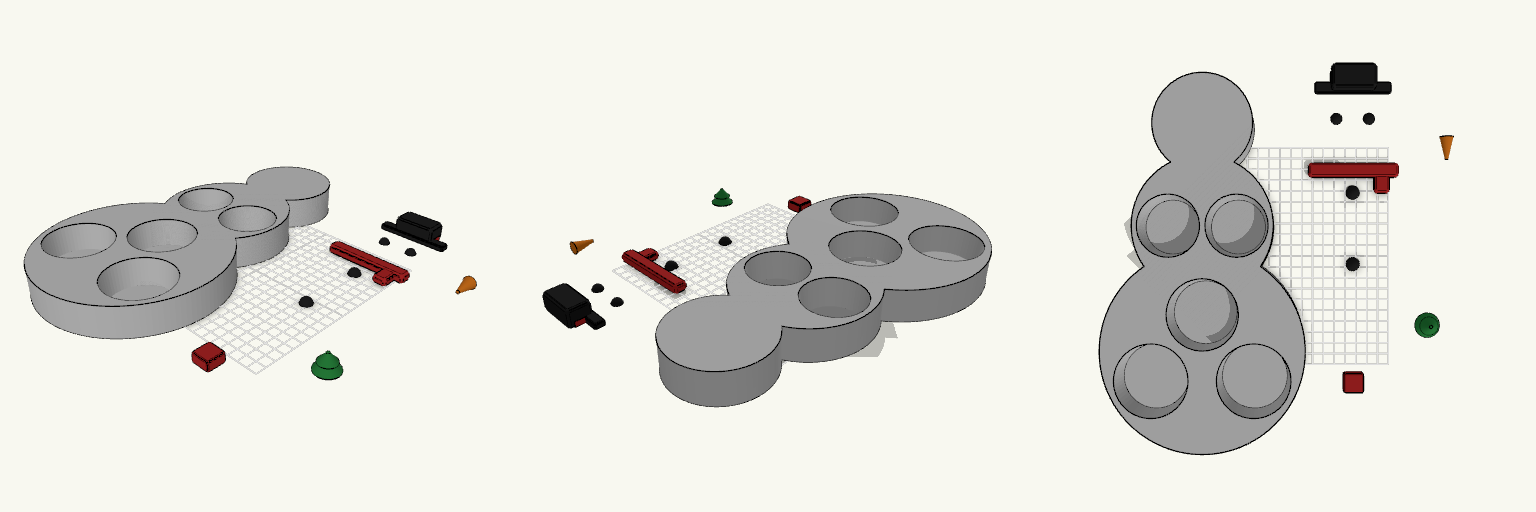
Flocon — Plateau Apéritif Bonhomme de Neige
Flocon est un plateau apéritif de Noël en forme de bonhomme de neige à trois boules, posé à plat pour rester stable sur la table. Cinq compartiments creux à fond plat sont intégrés dans les deux boules basses pour les chips, cacahuètes, bonbons et biscuits. Les décors — chapeau, écharpe, boutons, yeux, nez en carotte, sapins et cadeau — sont sculptés en véritable relief, mais fournis en pièces séparées posées à plat à côté du bonhomme : les compartiments restent dégagés et chaque couleur peut être exportée séparément. Dimensions Bonhomme de neige : environ 180 × 334 mm, pour 30 mm d’épaisseur ; prévoir de la place à côté pour les décors. Compartiments : cinq à fond plat — deux d’environ 66 mm et un d’environ 64 mm dans la grosse boule du bas ; deux d’environ 56 mm dans la boule du ventre. Parois : environ 4 à 5 mm au bord des compartiments. Décors séparés : écharpe et cadeau, chapeau-boutons-yeux, nez carotte et sapins, tous posés à plat. Pièces et couleurs Blanc : le bonhomme de neige. Rouge : l’écharpe, le cadeau et le bandeau du chapeau. Noir : le chapeau, les boutons et les yeux. Orange : le nez en carotte. Vert : les sapins. Impression Décors imprimés à plat à côté du bonhomme, chacun avec sa base sur le plateau : pas de supports à prévoir. Le nez est couché sur le côté ; surveiller son adhésion au plateau au premier essai. Fonds de compartiments plats et parois évasées, faciles à nettoyer. Pièces séparées par couleur, à exporter couleur par couleur pour conserver le rendu multicolore.
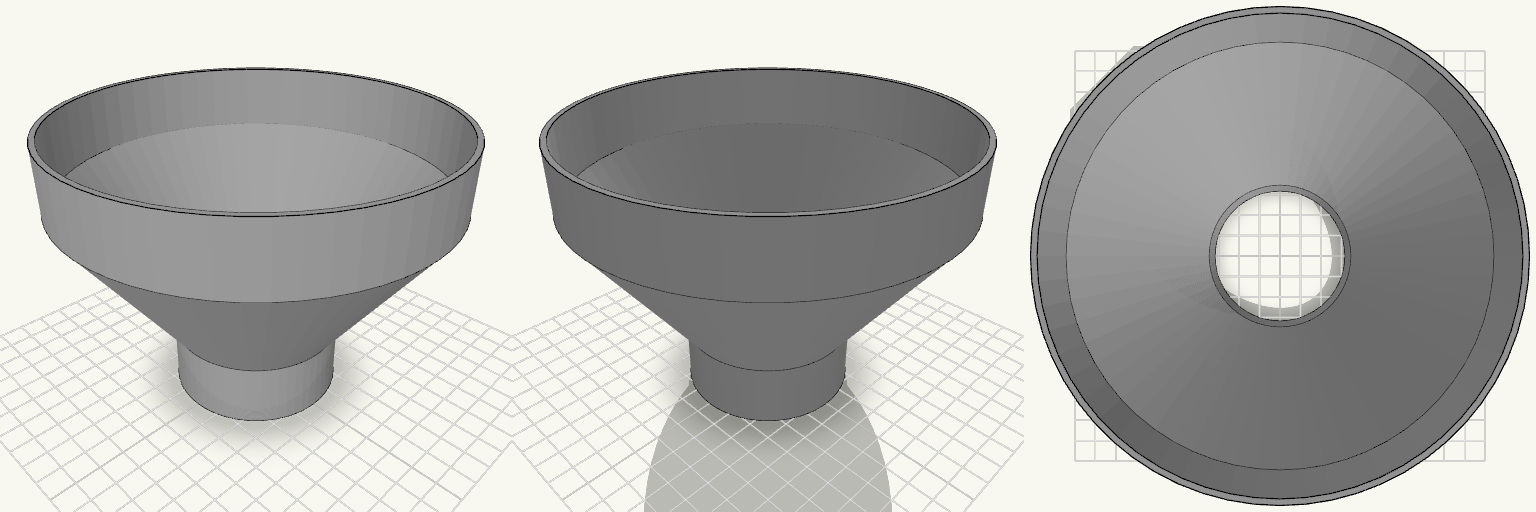
Funnel 6 to 2.5 Inch
A one-piece funnel with a 6 in (152.4 mm) inner diameter at the wide end, tapering to a 2.5 in (63.5 mm) inner diameter spout. Each end has a 1 in (25.4 mm) straight wall. Remix hooks Taper length: 60 mm cone section. Lengthen for a gentler slope, shorten for a squat funnel. Wall thickness: 2 mm. Raise to 3 mm for rigidity with heavy contents. Spout diameter: 63.5 mm inner. Change it to match a specific container neck. Pairs with: a mesh strainer disc sitting in the 1 in top collar, or a rubber gasket on the spout. Variants: add a rim lip or hanging tab.
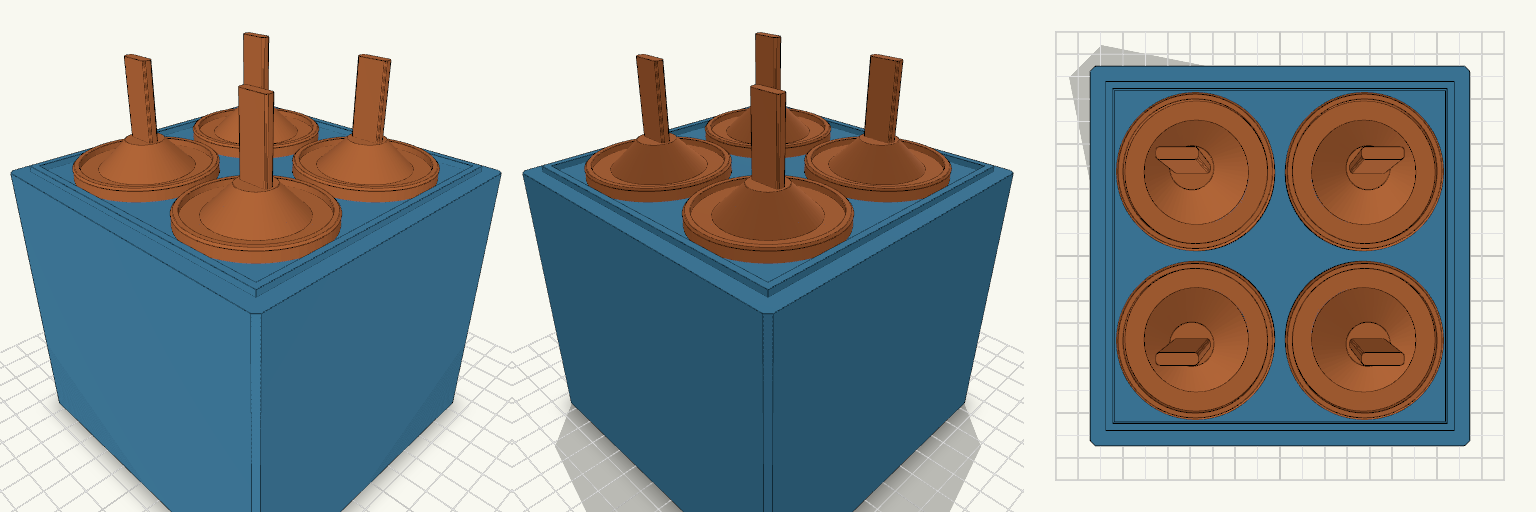
Stackable 4-Pop Ice Lolly Mold
A 2x2 ice lolly mold that makes four pops at once, with a separate stick for each cavity. Each stick flares into a 45 mm round catch disc, so melting juice lands on the disc instead of running down a child's arm and onto the floor. What it's for Making four ice lollies per fill, with a drip guard built into every stick. Summer use with kids, where sticky hands and floors are the main problem. Stacking several molds in a freezer. A lip on top fits a groove underneath. Dimensions Mold body: 110 x 110 mm footprint, 96 mm tall, plus a 2 mm stacking lip on top. Cavities: 90 mm deep, 30 mm across at the mouth, tapering to a rounded tip with an 8 mm radius. Cavity spacing: 48 mm centre to centre in a 2x2 grid. Sticks: 10 mm wide and 3 mm thick, with a 45 mm disc and a raised rim (about 4 mm tall). Disc: dished, with a 41 mm inner recess to hold drips. Print notes Print the mold body upright, with the cavity openings facing up. Print each stick disc-down so the disc lies flat on the bed. Use food-safe filament and a smooth finish if the mold will touch food. Wash it thoroughly before use. Remix ideas Change the tip radius for a blunter or sharper pop. Make the disc larger for extra-messy flavours. Add a name or initial on each disc to tell kids' pops apart. Change the cavity count to a 1x4 or 3x3 layout.
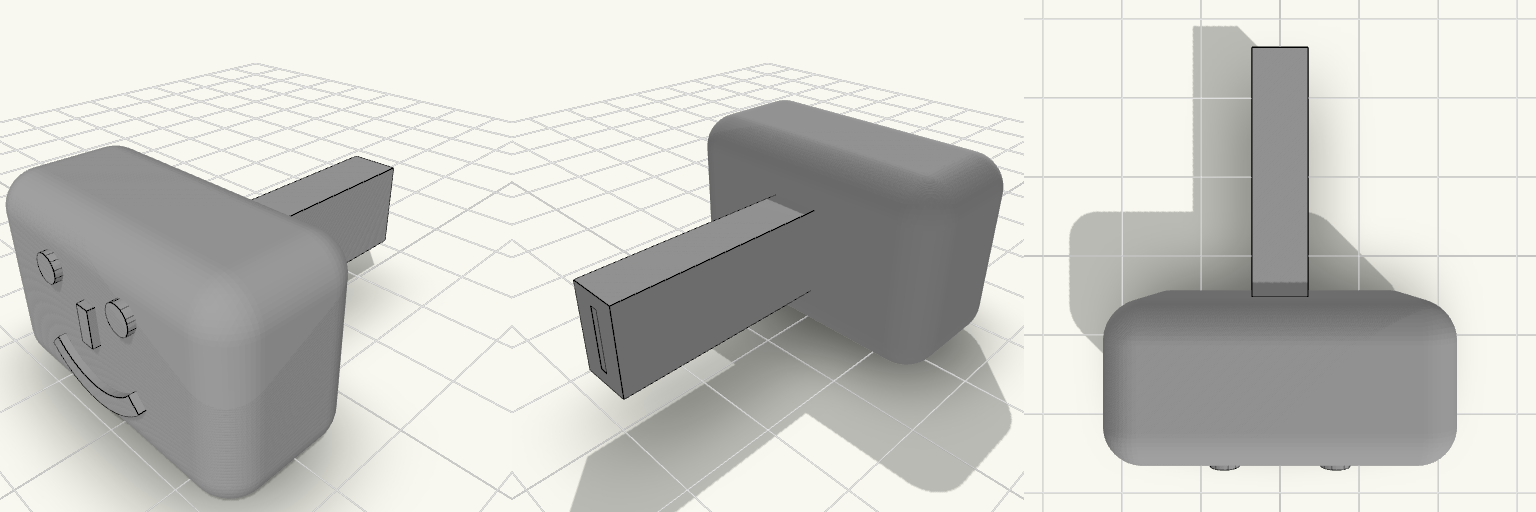
Toaster knob.
A replacement knob for a toaster's pull-down lever. The head is 34 × 22 × 16 mm with rounded edges so it sits comfortably under the fingers, and the pin on the back passes through the vertical 6 mm slot in the toaster body to reach the metal lever inside. Knob face to pin tip, the part runs about 42 mm long, and it prints as a single piece with no assembly. The front of the head carries a raised :-) smiley, turned upright and centred, standing 0.8 mm proud of the face. It is made of two 3 mm round eyes, a short vertical nose bar and a curved smile, with the lines drawn thick enough to print cleanly on a 0.4 mm nozzle. Print the knob on its back with the front face up so the relief comes out sharp. The lever slides into a deep slot in the pin and is held by friction rather than by any fastener. Sawtooth ridges along the bottom of the slot let the lever push in easily and resist slipping back out, so the knob stays on through repeated toasting cycles. The slot is deliberately made 0.1 mm narrower than the 1 mm lever, so the fit is snug from the first print: it has to be pressed on, and the slot walls can be filed if it turns out too tight. A loose fit would mean a reprint, so start snug. Print at the stated dimensions rather than scaling, because the friction fit depends on the slot width. Head: 34 × 22 × 16 mm (W × H × D), rounded edges, raised smiley on the front Smiley: 3 mm eyes, 1.6 mm nose bar, 1.8 mm smile, 0.8 mm proud Pin: 5.6 × 10 × 25 mm, centred on the back of the head Lever slot: 0.9 mm wide × 7 mm tall, 22 mm deep measured from the pin tip Teeth: 1 mm sawtooth ridges at 2 mm pitch, starting 10 mm in from the pin tip Fit: 0.1 mm interference on a 1 mm lever — file the slot walls if it binds, never the lever Printing: one piece, no assembly; print on its back with the front face up
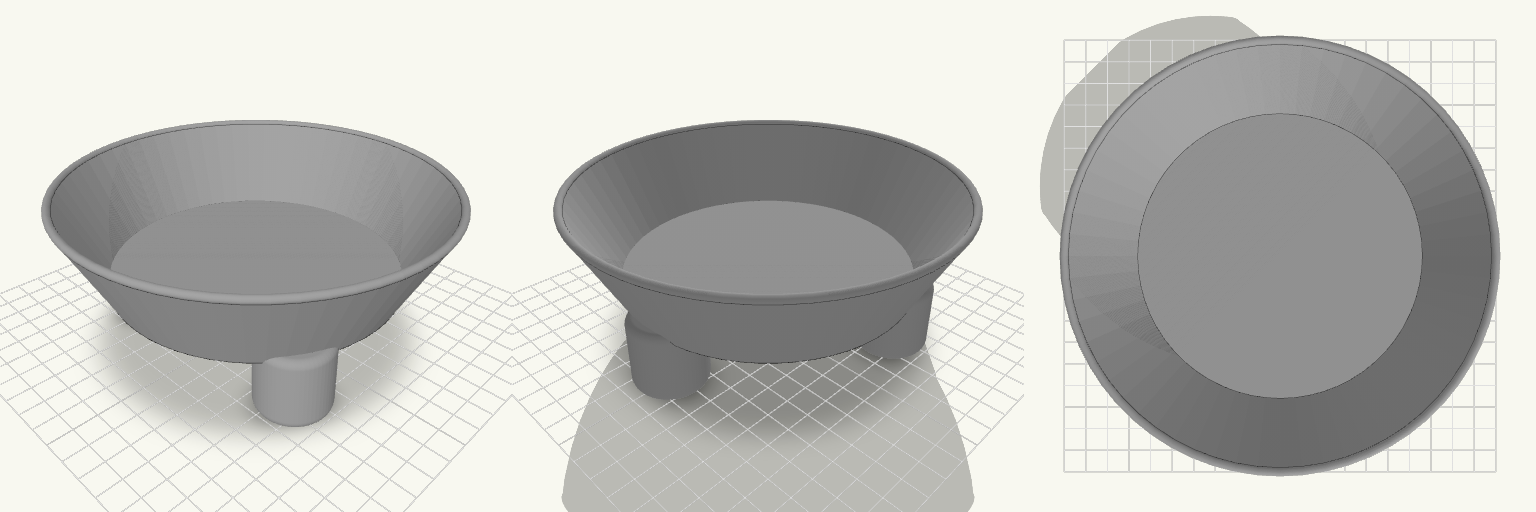
Napf Test1
Ein breiter, flach aufliegender Napf auf drei weit ausgestellten Füßen – die Silhouette erinnert an eine flache Schale auf einem Dreibein, und genau das ist hier auch der Zweck: eine ruhige, kippsichere Trinkstelle für Katzen, die nicht mehr gerne den Hals strecken. Der Rand liegt rund 65 mm über der Standfläche, die Schale fasst 35 mm tief Wasser – niedrig genug für eine alte Katze, breit genug, dass die Schnauze nirgends anstößt. Die Schale ist rund und misst gut 158 mm im Durchmesser; ihre Wand neigt sich leicht nach außen, der Trinkrand ist rundum verrundet. Der Boden ist in der Mitte durchgehend geschlossen und dicht, sodass das Wasser bleibt, wo es hingehört. Getragen wird das Ganze von drei breiten, gleichmäßig im Kreis verteilten Füßen, die dem Napf einen standsicheren, flachen Auftritt geben. Konstruktionsnotizen Drei breite Standfüße, im Kreis um 120° versetzt – kippt nicht beim Trinken Leicht nach außen geneigte Wand mit rundem Trinkrand Durchgehender, 4 mm dicker Schalenboden, alle Kanten verrundet Ein geschlossener, dichter Körper – in einem Stück druckbar, ohne Stützstrukturen Für den Druck braucht es keine Stützen; der Napf kommt als ein zusammenhängendes Teil vom Bett und ist sofort als Wasserschale nutzbar. Wer mag, kann die Füße breiter ziehen oder die Innentiefe flacher halten – beides ändert am Aufbau nichts.
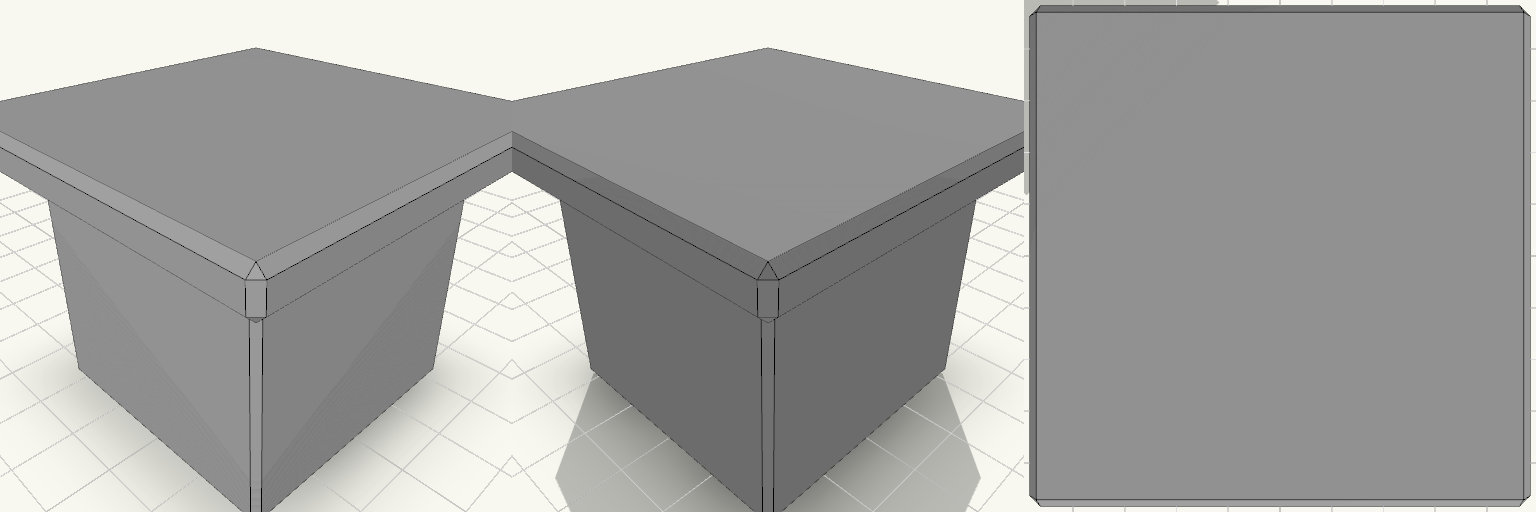
Brutalist T-Post Cap with Square Platform
A blocky sleeve that drops over a T-post and carries a flat square platform on top — a brutalist plinth silhouette in cap form, all hard edges and stacked planes. The pocket inside is T-shaped, cut generously around a typical steel fence T-post: a 38 × 7 mm flange opening and a 7 × 38 mm stem slot, leaving roughly a millimetre of play per side so it drops on without a fight. The sleeve is 40 mm deep with 3 mm walls and a 4 mm roof, and the whole cap stands 46 mm tall over a 60 × 60 × 6 mm platform. Design notes T-shaped pocket for a T-post — flange opening 38 × 7 mm, stem slot 7 × 38 mm. Pocket sized with a little slack per side; the 7 mm slot width is the fit-critical dimension on real posts. 40 mm deep sleeve, 3 mm walls, 4 mm roof. 60 × 60 × 6 mm square platform sits on top as one solid piece with the sleeve. Overall footprint on the print plate: 60 × 60 mm, 46 mm tall. Prints as a single part; no assembly and no fasteners. Good to know The pocket is shaped from a typical steel fence T-post rather than a measured one — check your post's flange width, stem length and metal thickness before committing to a long print. Platform size is independent of the pocket, so it can grow or thicken without touching the post fit. Tightening or loosening the pocket is a small change if the cap ends up sloppy or stubborn on the post. The sleeve's outside was widened to 44 mm to keep the walls at a full 3 mm around the bigger pocket, so the cap stays chunky rather than thin-shouldered.
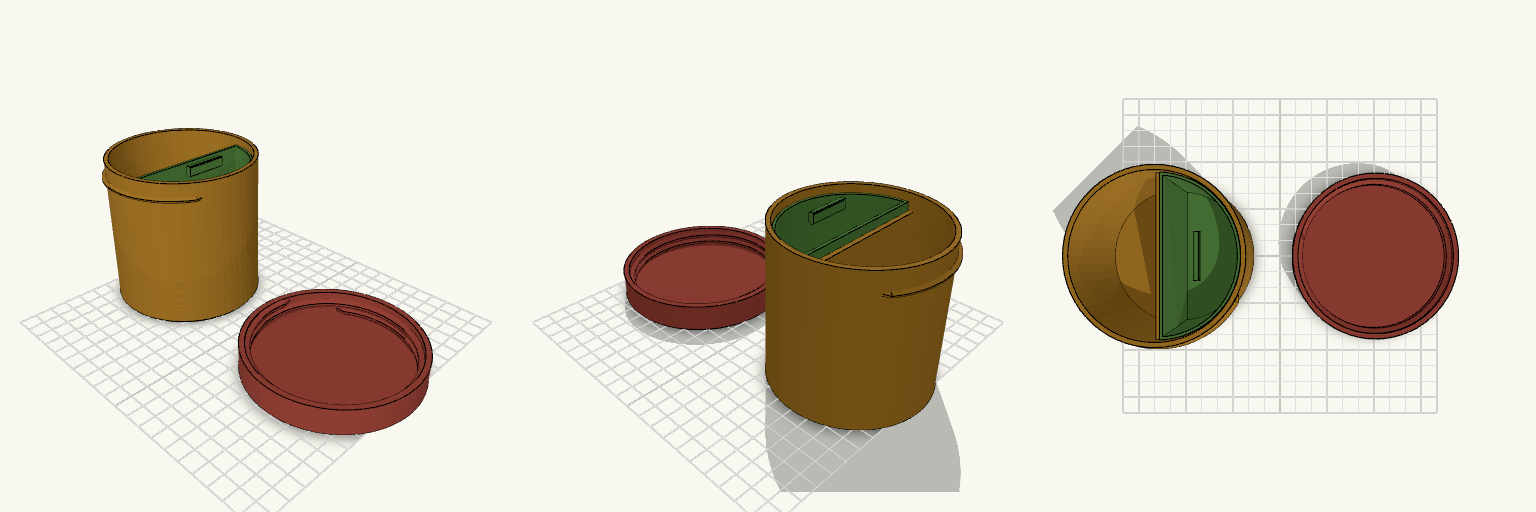
Zylindrischer Sonnenblumenkern-Becher mit Deckel und abnehmbarem Mülleimer
Wofür es gedacht ist Der zylindrische Becher ist eine mobile Snackbox für Sonnenblumenkerne. Eine Hälfte nimmt die Kerne auf, die andere den abnehmbaren Mülleimer für die Schalen. Der Deckel wird aufgeschraubt und ist vollständig geschlossen, ohne Einwurföffnung. Zum Entnehmen der Kerne und zum Einwerfen der Schalen in den Mülleimer wird der Deckel abgeschraubt. Feste Trennwand teilt den Becher in zwei Hälften Eine Hälfte für Sonnenblumenkerne Andere Hälfte mit abnehmbarem Halbmond-Mülleimer und Griffleiste Aufschraubbarer, vollständig geschlossener Deckel Aufbau Becher, Mülleimer und Deckel sind eigene Teile. Der Becher trägt oben ein Außengewinde mit 5 mm Steigung, der Deckel das passende Innengewinde; die Deckelwand ist um das Gewinde herum stabil ausgeführt. Der Mülleimer lässt sich nach dem Abschrauben des Deckels zum Entleeren herausziehen. Zum Drucken werden die Teile getrennt angeordnet; der Deckel liegt mit der Oberseite nach unten neben dem Becher und wird im Gebrauch aufgeschraubt. Becher mit fester Trennwand und Außengewinde (5 mm Steigung) Herausnehmbarer Mülleimer Separater, geschlossener Deckel mit Innengewinde (5 mm Steigung) Maße Becher: rund 92 mm Durchmesser, 90 mm hoch Mülleimer: ca. 40 × 84 mm Grundfläche, 88 mm hoch Deckel: ca. 101 × 101 mm, 17 mm hoch Remix-Ideen Zusätzliche Klappe über der Kernseite ergänzen Größere oder kleinere Zylindervariante für andere Portionen Gewinde und Deckelpassung anpassen Mülleimer mit größerem Griff oder anderer Öffnung versehen
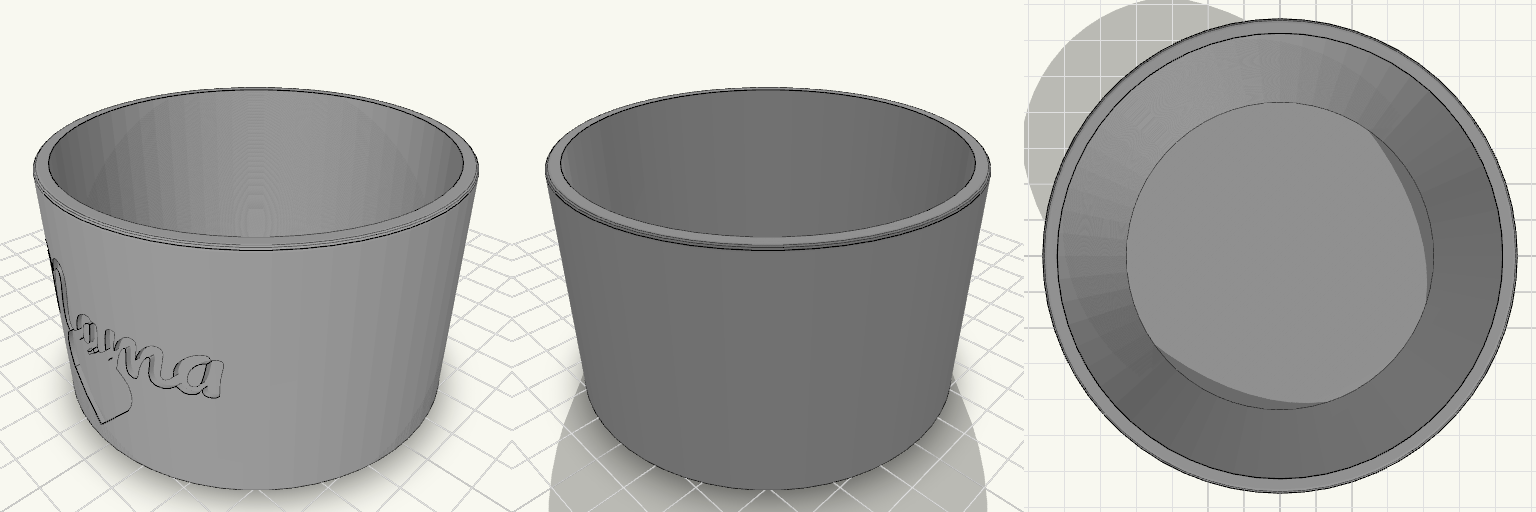
Nusszylinder — Schale für Erdnüsse
Nusszylinder ist eine bewusst schlichte, zylindrische Schale für Erdnüsse. Sie kommt ohne integriertes Schalenfach aus und setzt auf eine klare, runde Form, die sich unkompliziert auf den Tisch stellen lässt. Der Durchmesser ist großzügig für eine kleine Portion Snacks, die höhere Wand hält den Inhalt besser zusammen, während Boden und Wand angenehm dünn bleiben. Auf der Vorderseite ist „Mama“ in Schreibschrift eingraviert, darunter sitzt ein Herz – beides folgt der Rundung der Wand und macht aus der schlichten Schale ein persönliches Stück. Maße Außendurchmesser: 90 mm Höhe: 55 mm Bodenstärke: 3 mm Wandstärke: 3 mm Gravur Schriftzug „Mama“ in Schreibschrift auf der Vorderseite Herz direkt darunter 1 mm tief eingraviert, der Wölbung folgend Bei 3 mm Wandstärke bleibt rundum genug Material stehen Hinweise Zylindrische Schale ohne separates Fach für Schalen Offene, einteilige Form ohne Inneneinteilung Für Erdnüsse und ähnliche Snacks gedacht Als persönliches Geschenk oder für den eigenen Tisch
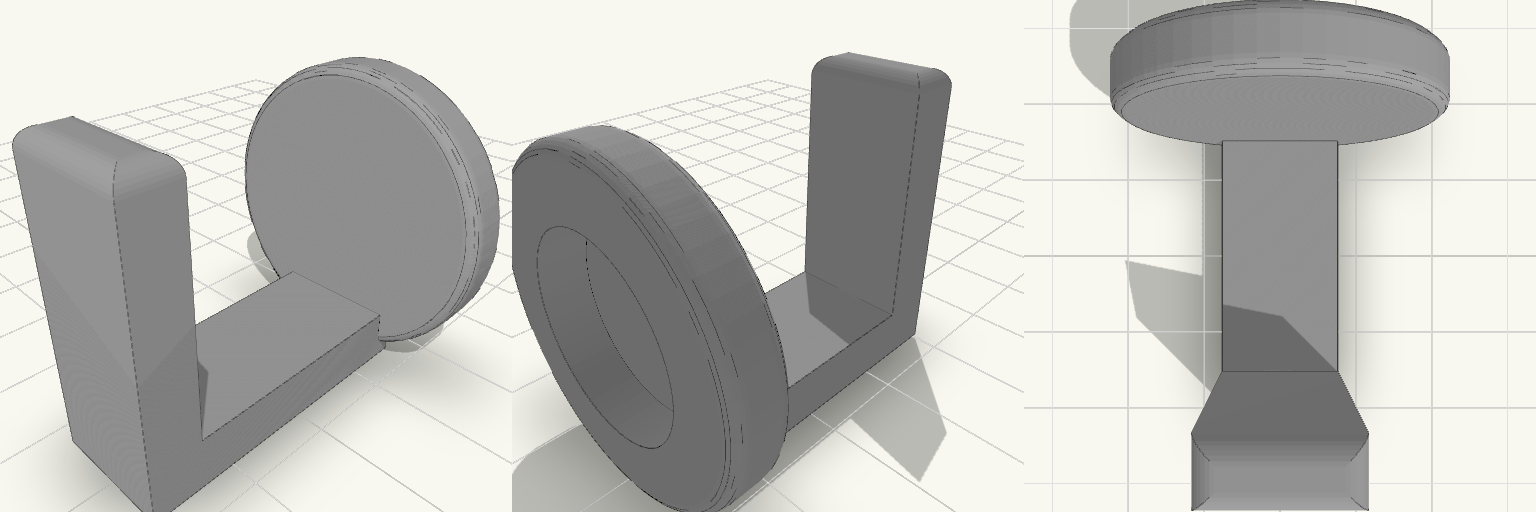
Deep J Fridge Hook with Magnet Recess
A deep J-shaped hook for hanging a tea towel on a fridge door. A round back plate holds a standard 20x5 mm neodymium disc magnet, and a tall lip at the end of the arm stops the towel sliding off when the door swings open. What it's for Hanging a tea towel on the side or front of a steel fridge door. Keeping the towel in place when the door is opened or closed, thanks to the tall lip. The magnet sits flush against the fridge door, with a 1 mm wall of plastic on the hook side. Dimensions Back plate: 34 mm diameter, 6 mm thick, with rounded edges. Magnet recess: 20.2 mm diameter, 5 mm deep, opening on the fridge side. The extra 0.2 mm gives a press fit without the magnet binding. Wall behind the magnet: 1 mm. Arm: 14 mm wide, 6 mm thick, 36 mm long. Lip: 14 mm wide, 6 mm thick, 34 mm tall. Overall footprint: 34 mm wide, 40 mm projection, 34 mm tall. Print notes Print with the arm's underside flat on the bed. No supports are needed for the arm and lip. The recess faces the back, so the plate's back face needs a clean first layer or a short bridge, depending on orientation. Secure the magnet with a drop of glue if the fit is loose. Check the magnet polarity before gluing, so it grips the fridge. Remix ideas Lengthen the arm for thicker towels or oven gloves. Shorten the lip for a lighter hook. Resize the recess for 15 mm or 25 mm magnets. Add a second hook arm for a double hook.
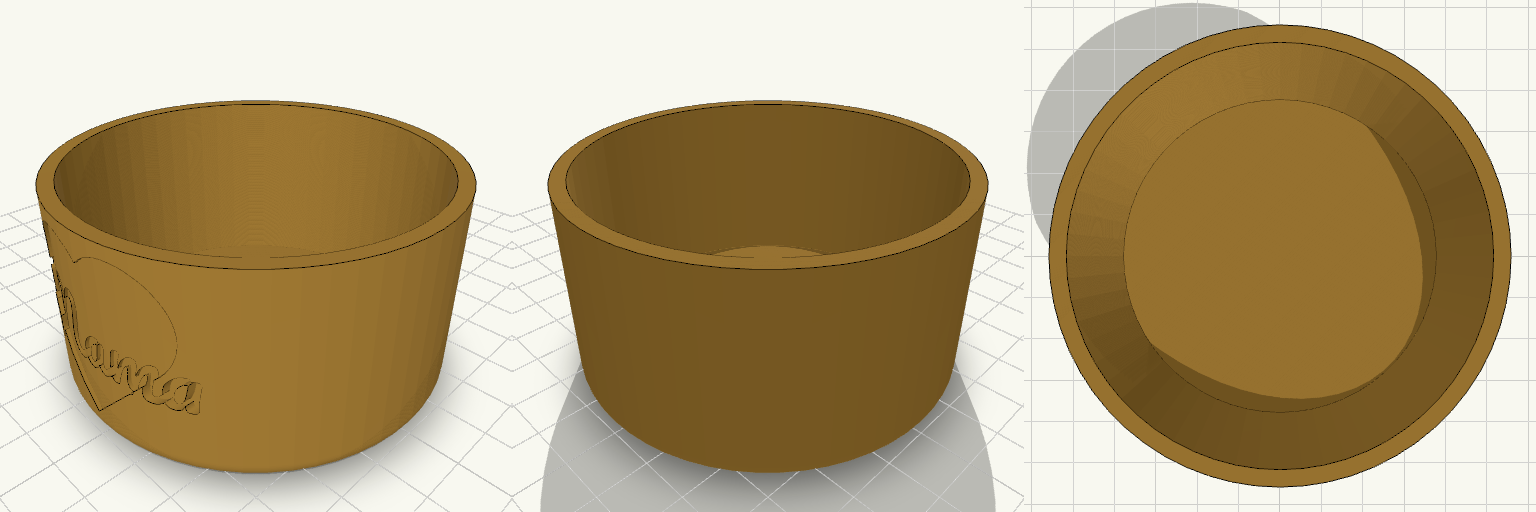
Zylinderschale „Mama“ mit Gravur
What it's for Zylindrische Erdnussschale mit eingravierter Schrift „Mama“ an der Vorderseite. Als Snackschale oder kleines Geschenk geeignet. Dimensions Durchmesser: 80 mm Höhe: 42 mm Wandstärke: 3 mm, Boden 3 mm Gravurtiefe: 1,5 mm Remix ideas Anderer Name oder andere Schriftart Gravur auf der Rückseite ergänzen Höhe oder Durchmesser anpassen
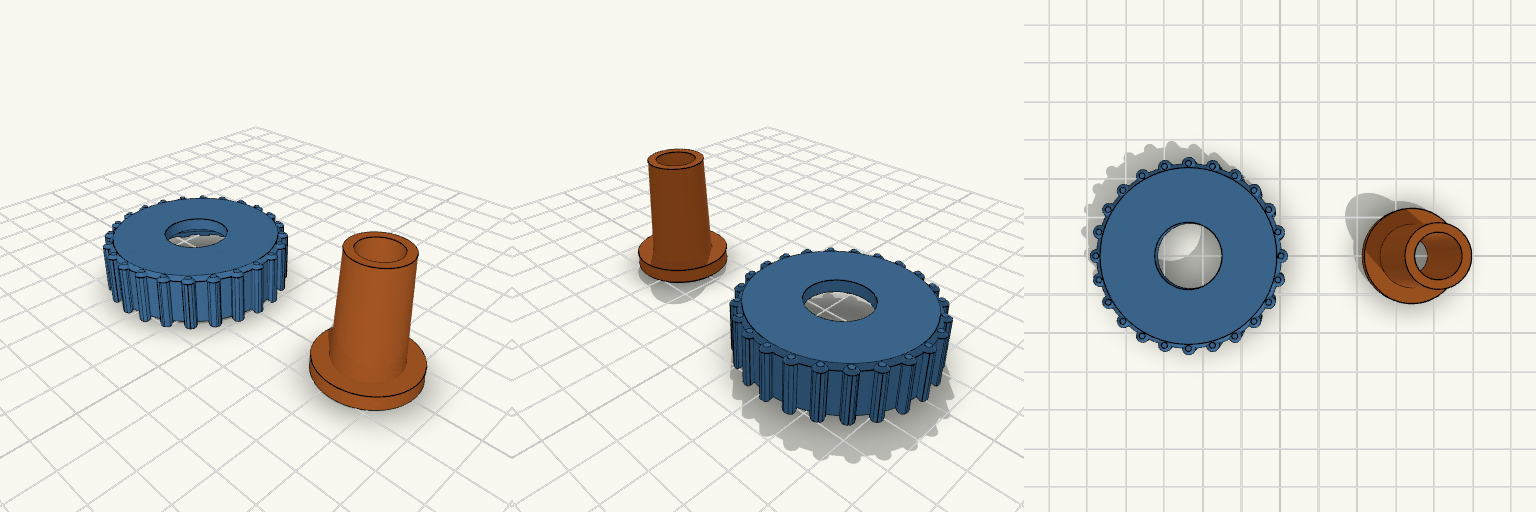
Ribbed Milk Bottle Cap (3 start thread) with Tube Adapter
A low-profile screw cap for a 2L milk bottle, paired with a separate tube adapter that passes through the cap from the inside. The cap has a 3-start internal thread sized for a 37.4 mm bottle thread, a 16 mm hole through the lid, and 24 vertical grip ribs around the outside for easier tightening. The adapter has a 4 mm flange that stops it pulling through the lid, and a tube that tapers from 15.9 mm to 14 mm. Cap: 44 mm body, 13 mm tall, 3 mm lid, 16 mm centre hole Thread: 39.4 mm major diameter, 3.2 mm pitch, 3 starts Adapter: 30 mm overall, 24 mm flange, 10 mm bore Print the cap lid-down and the adapter flange-down
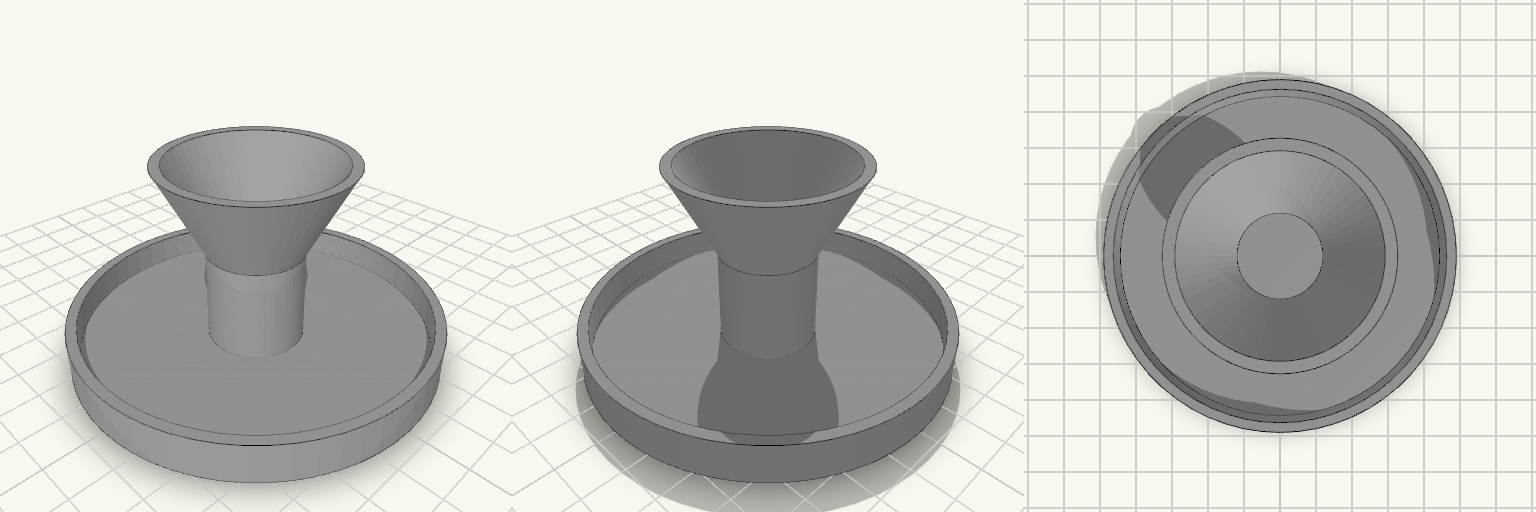
Modern Egg Cup With Shell Dish
A one-piece egg cup for soft-boiled eggs. The cup has a 42 mm opening that tapers inward, so a standard chicken egg (about 45 mm at its widest) sits snugly at the rim. It stands on a short stem inside a wide 92 mm dish with a 10 mm lip, which catches the shell top when you crack it off. Remix hooks Opening diameter (42 mm): Make it 40 mm for small or bantam eggs, or 44 mm for a looser fit with large eggs. Keep it a few mm under the egg's widest point so the egg sits on the rim instead of dropping in. Cup height and taper: The cup is 48 mm tall overall, narrowing to a 20 mm seat. A shorter cup shows more of the egg. A steeper taper holds it more upright. Dish size (92 mm wide, 10 mm lip): Widen it or raise the lip to catch more shell. Shrink it for a tighter footprint. Stem (about 12 mm radius): Thicken it for more stability, or lengthen it to lift the cup higher above the dish. Pairs with A matching spoon rest, or a second cup in a different colour for a set. A flat lid or cap over the opening to turn the dish into a small storage cup. A set of four on a shared tray. Dimensions have not been test-printed. The dish floor is 3 mm thick, which is a good first value to check before changing anything else.
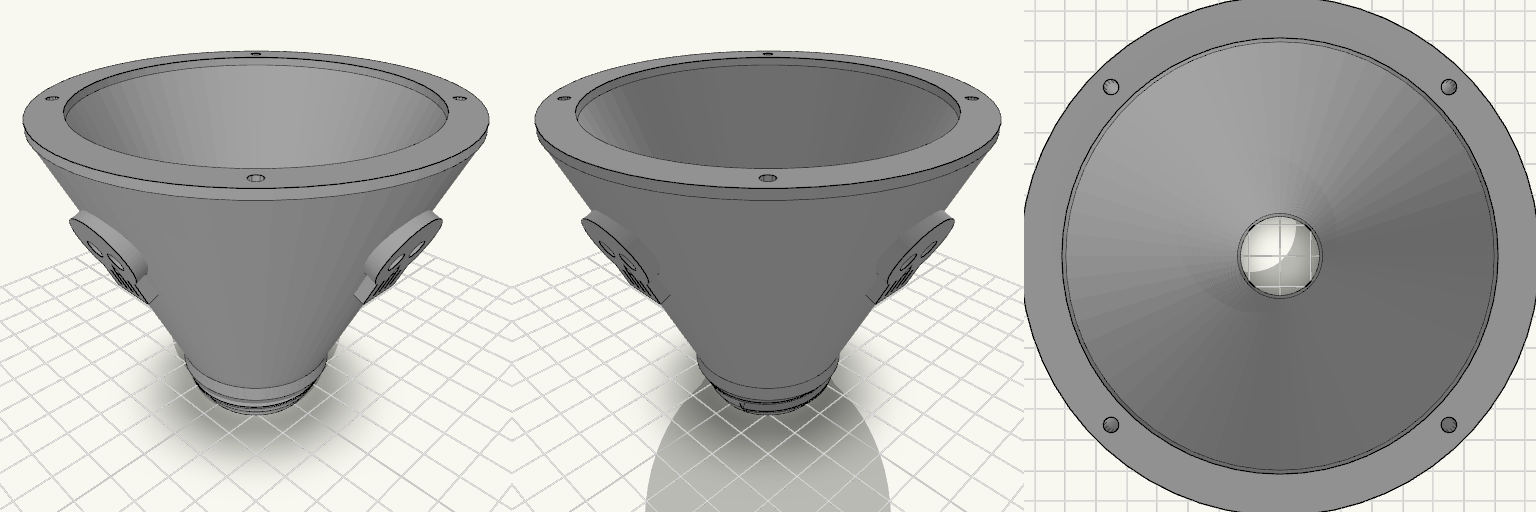
Steep-Shouldered Funnel for Clean, Targeted Pouring
A broad-shouldered funnel with a gothic streak: a 100 mm outside rim (84 mm inside) gathers a jug or bottle mouth, the cone narrows into a 26 mm bore, and the stream drops toward the filler. At 82 mm tall it stays compact enough for a tight engine bay, and the inner cone has no side holes, so the pour runs down the middle. The spout is built around a 36.5 mm major-diameter, 3 mm pitch right-hand screw thread that runs the full 10 mm from the tip up to a 40 mm sealing shoulder. The 26 mm bore keeps the pour path open; the thread is the fit feature, so check the filler neck and gasket stack before printing, since the thread has to match the mating part. Four sealed air tunnels, 3 mm across and spaced 90° apart, run inside the wall from the top rim down through the cone. At the lower end each turns inward and opens through the bore wall about 3 mm above the spout tip, so the bottom face stays solid and air can climb while oil runs down the middle. No holes pierce the side of the cone, so it vents without weeping out. The threaded spout wall carries these passages; at the bore openings the material is thin, so inspect the slicer preview before printing. Four raised skulls ring the cone between the tunnels, one every 90°, angled to follow the slope. Each is about 19 mm wide and stands roughly 2.5 mm proud of the surface, with eye sockets, nose and teeth lines cut into the face; the fine teeth lines may print faintly on a 0.4 mm nozzle. They give the funnel a gothic edge without interrupting the flow path. Fit notes 36.5 mm major-diameter, 3 mm pitch right-hand screw thread on the spout Threaded section runs the full 10 mm from the spout tip to the sealing shoulder 40 mm sealing shoulder for a gasket 26 mm bore through the spout Verify thread fit and gasket compression on the filler neck before printing Check the thin tunnel openings near the bore in the slicer preview Design notes 100 mm outside opening, 84 mm inside — a wide catch area 82 mm overall height Four internal 3 mm air tunnels, evenly spaced, opening into the bore about 3 mm above the tip and exiting at the rim Four raised skulls about 19 mm wide and 2.5 mm proud, set between the tunnels Prints as one piece
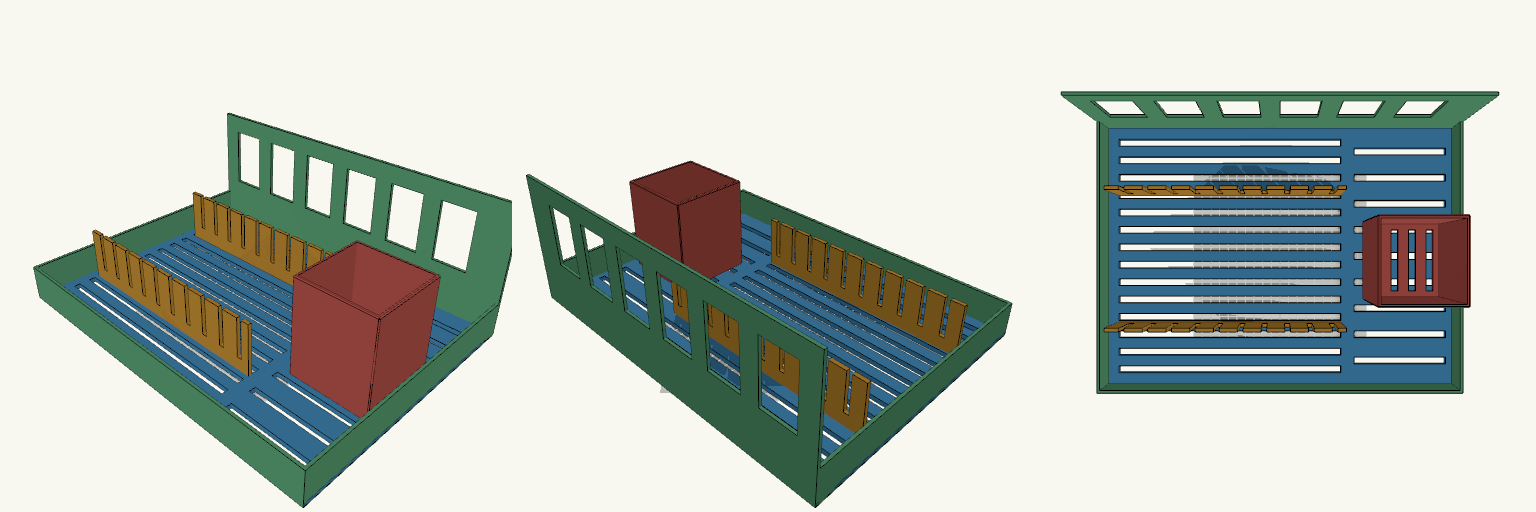
Asma Beisembayeva
A dish drying rack with a slotted base, raised sides, a tall back panel, a vertical-slot plate section, and a separate cutlery holder. The base drains along its length through parallel slots, while the plate section holds plates upright. Specifications Overall size: 400 × 300 × 150 mm. Base: 5 mm thick with parallel 8 mm drainage slots. Sides: 40 mm front and end walls; full-height back panel with window cutouts. Plate section: two 4 mm thick rails, 65 mm tall, spaced 150 mm apart, with vertical slots at 25 mm pitch. Cutlery holder: separate 90 × 90 × 110 mm open box with drain slots in its floor; prints on its own. Print check: the 400 mm length needs a bed at least that long, or split the rack into sections.
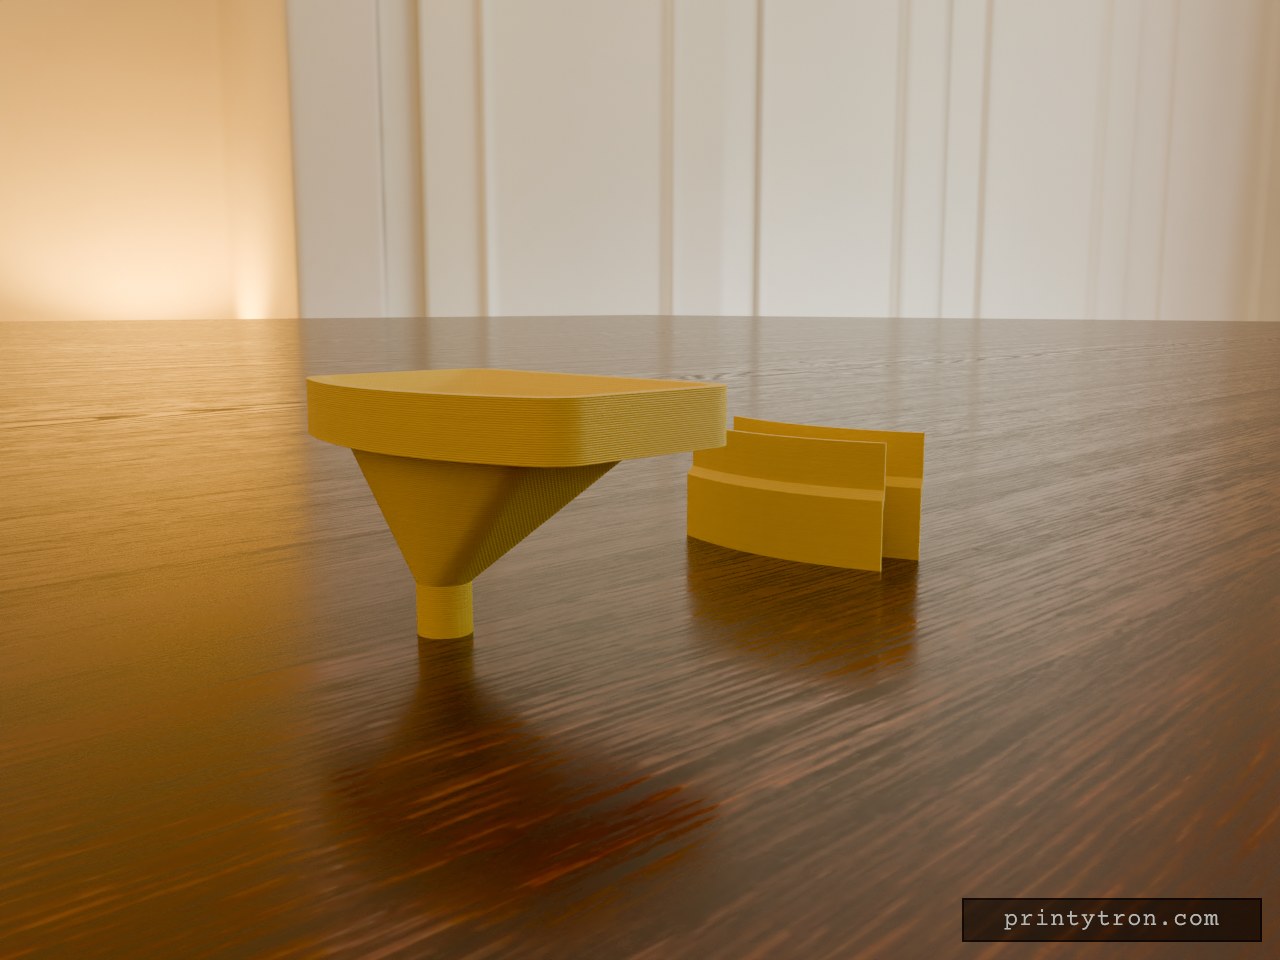
5 Gallon Bucket Urine diverter Funnel With Glue-On Clip
A urine diverter for a 5-gallon bucket. This funnel has a curved outer edge and a skirt, and it comes with a separate curved clip strip that glues to the bucket wall so the skirt hooks over it. I the clip is too near the edge because of taper at the bucket top, just print 2 and glue together (I only printed bottom half of second) Key numbers Bucket inside diameter: 296 mm (clip and funnel curve at 148 mm radius) Clip: about 44° of arc, around 114 mm long, 54 mm tall, 2.5 mm thick Profile: lower section glues flat to the bucket wall, then steps in 2.5 mm so the top stands off the wall by the skirt thickness Skirt: 20 mm tall, 2.5 mm thick, drops into the gap behind the clip's upper lip Spout: 19 mm outside, 15 mm bore Print: clip standing upright, brim needed for support; glue the lower face to the bucket wall
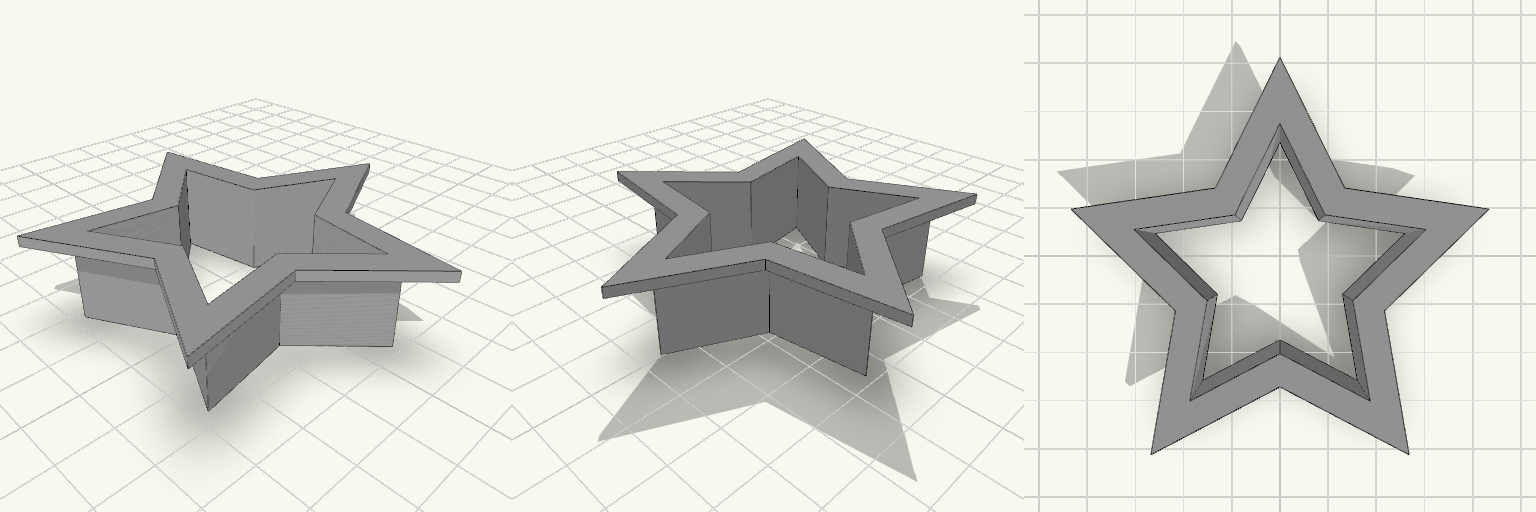
5-Point Star Cookie Cutter
A five-point star cookie cutter, 60 mm tip to tip, with 18 mm tall walls and a wide flat flange around the top edge. The flange gives a thumb a broad surface to press on, so pushing the cutter through dough doesn't put a thin edge against your skin. Remix hooks The values below are the ones worth changing. Everything else follows from them. Star size (R, 30 mm): This is the tip radius, so 60 mm across. Change it to scale the star. At about 40 mm across or less, check that the flange doesn't crowd the inner corners. Point sharpness (ratio, 0.5): This is the inner radius divided by the outer radius. Lower values like 0.4 give spikier points. Higher values like 0.6 give a chubbier, more rounded star. Very spiky points are harder to press out of dough. Flange (flangew 4 mm, flanget 2 mm): Widen it for a more comfortable press, or thicken it for more stiffness. Rounding the flange's outer corners is an easy variant if you want it softer on the thumb. Wall (wall, 1.2 mm): This is about three nozzle widths on a 0.4 mm nozzle. Thinner cuts more cleanly but is more fragile. Thicker is sturdier but pushes dough aside more. Height (H, 18 mm): Lower it for thin cookies, or raise it for thick dough or a deeper grip. Pairs well with A set of different sizes, made by changing R and nothing else. Other shapes that reuse the same wall and flange values, such as a heart or circle, so the whole set feels the same in the hand. A matching stamp or embossing plate that fits inside the cutter opening. Printing Print it flange-up or flange-down on the bed. Flange-down needs no supports, and the thin walls grow straight up from the flange. Use food-safe filament if you want to use it on dough.
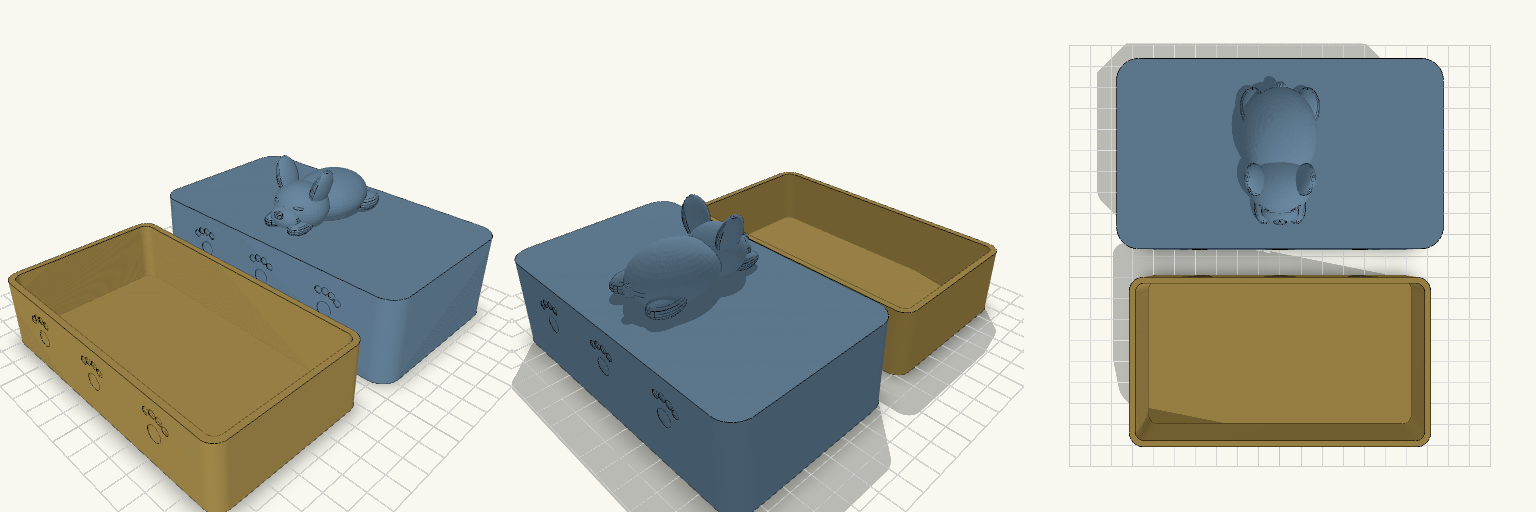
Schlafmützchen: Butterdose mit schlafender Bulldogge
Schlafmützchen: Auf dem Deckel dieser Butterdose hat sich eine kleine französische Bulldogge niedergelegt – große Ohren aufgestellt, kurze Schnauze, geschlossene Augen, die Vorderpfoten nach vorn gestreckt. Ringsum zieren kleine Pfotenabdrücke die Längsseiten von Schale und Deckel. Die Butterdose ist bewusst süß, schlicht und harmonisch gehalten: eine flache, stabile Schale und ein abnehmbarer Deckel mit weich abgerundeten Ecken. Auf einen Blick Zwei separate Teile: Schale und Deckel mit Bulldogge Innenraum für ein normales 250-g-Stück Butter; Schale ca. 128 × 72 × 30 mm Pfotenabdrücke 0,8 mm tief, je drei an beiden Längsseiten FDM-geeignet: flach liegend, ohne Stützen druckbar; Deckel mit Bulldogge nach oben drucken Die Bulldogge bleibt kompakt und ruhig, die Ohren laufen nach oben schmal zu. Der Deckel sitzt mit leichtem Spiel auf der Schale und liegt auf deren Rand auf.
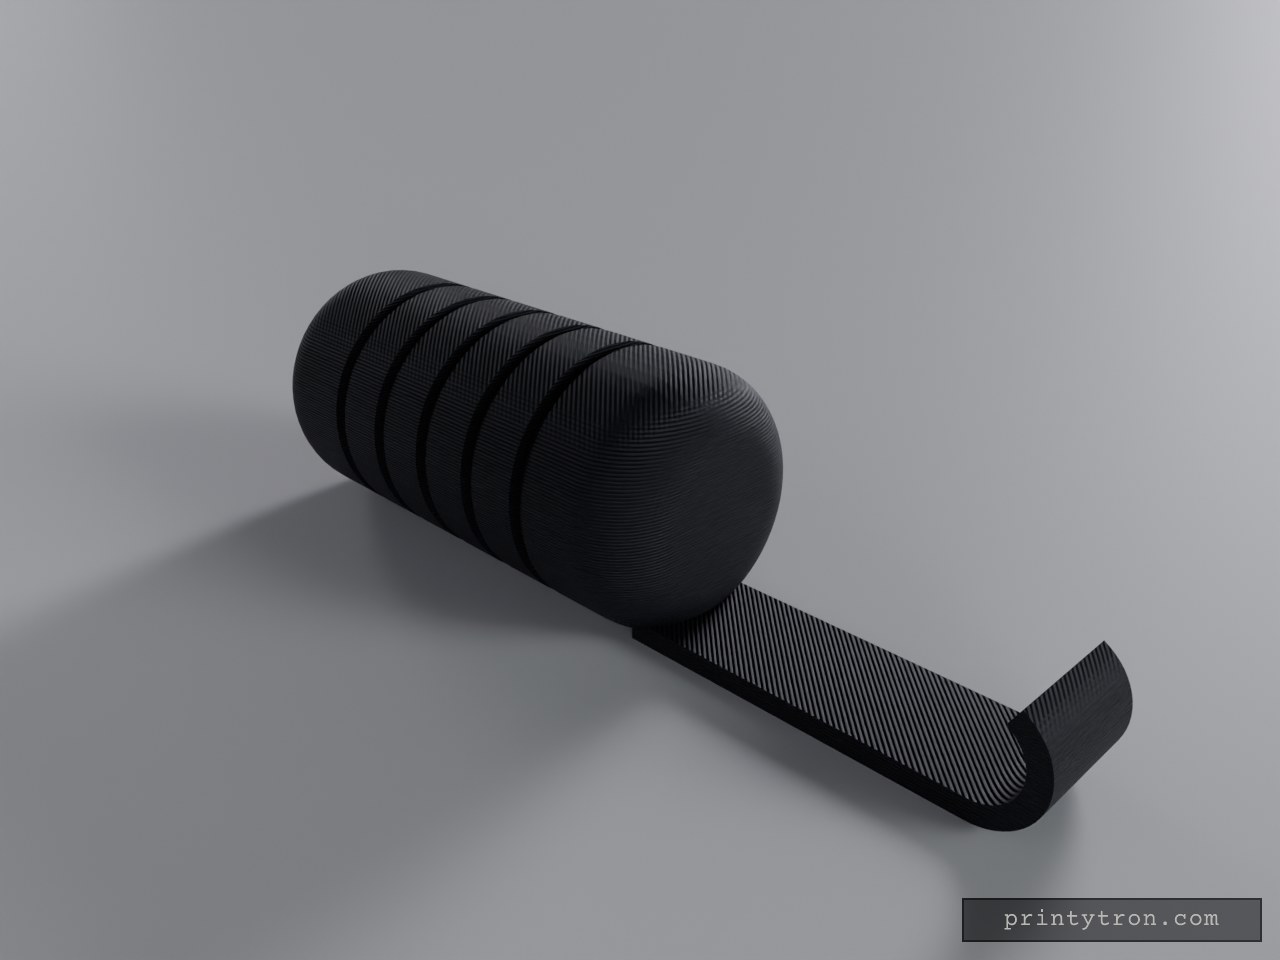
90mm Can Ring Pull Lever Tool
A hand-held lever for lifting can ring pulls without using fingernails. A thin curved hook slides under the ring, and a thick barrel handle gives the leverage to lift it. Suited to anyone with limited grip strength or short nails. Specifications Overall length: 90 mm Handle: 25 mm diameter barrel, about 55 mm long, with ring grooves for grip Hook blade: 2 mm thick, 12 mm wide, curved upward at the tip to slide under the ring Construction: single welded body, printed as one piece Orientation: print with the handle and blade lying flat on the bed. Supports may be needed under the barrel's curved underside. Material: PETG or PLA. PETG is preferred for the 2 mm blade because it flexes before it breaks. Use: ring-pull cans such as beans, soups and drinks Notes The 2 mm blade is the thinnest part. Print it with at least 3 perimeters for strength. The grip grooves are shallow, so the handle stays easy to wash.
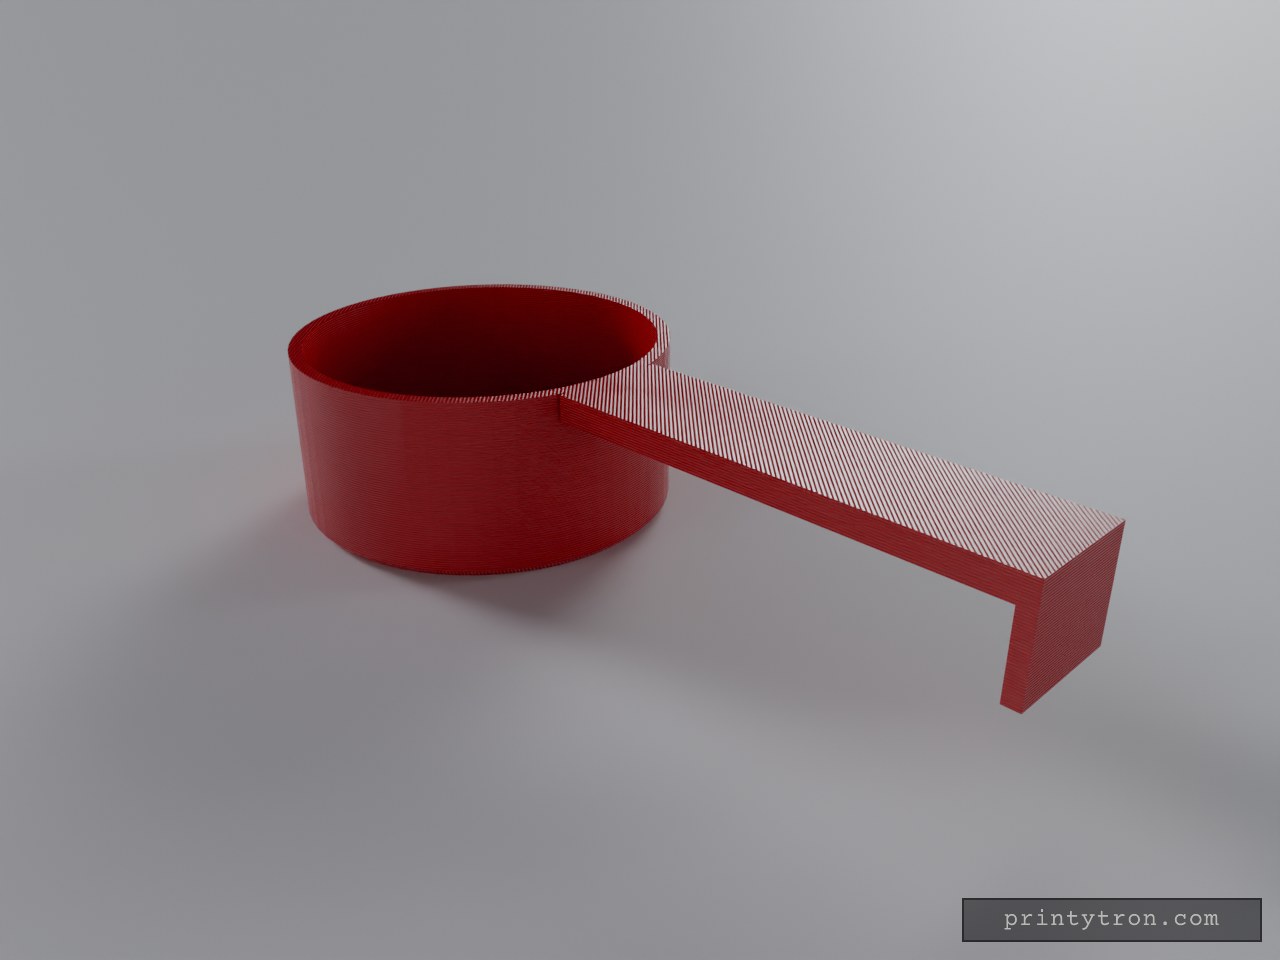
LevelUp — 60 ml Clip-On Scoop
LevelUp is a single-piece measuring scoop sized to hold exactly 60 ml when filled level, made as a replacement for a lost tub scoop. It suits coffee grounds or protein powder. The rim is sharp and flat across the whole top, and the handle sits flush with it, so a knife can sweep straight across to strike off the excess. A short downward lip at the end of the handle hooks over the edge of the tub to keep the scoop in place. Dimensions Bowl inner diameter: 55 mm Bowl inner depth: about 25.3 mm, which gives 60 ml Floor thickness: 2 mm Wall thickness: 2 mm (59 mm outer diameter) Handle: 70 mm long, 18 mm wide, 4 mm thick Clip lip: 12 mm drop, 2.5 mm thick Features Flat, level rim and handle top for accurate strike-off Chamfered bottom edge on the bowl Plain lip clip, not a full hook Print notes Print bowl-down so the rim and handle top come out flat. The clip lip was sized without measuring a specific tub. Adjust it to the thickness and height of your tub's edge. For food contact, use a food-safe filament, and expect layer lines to hold powder. Hand-wash it.
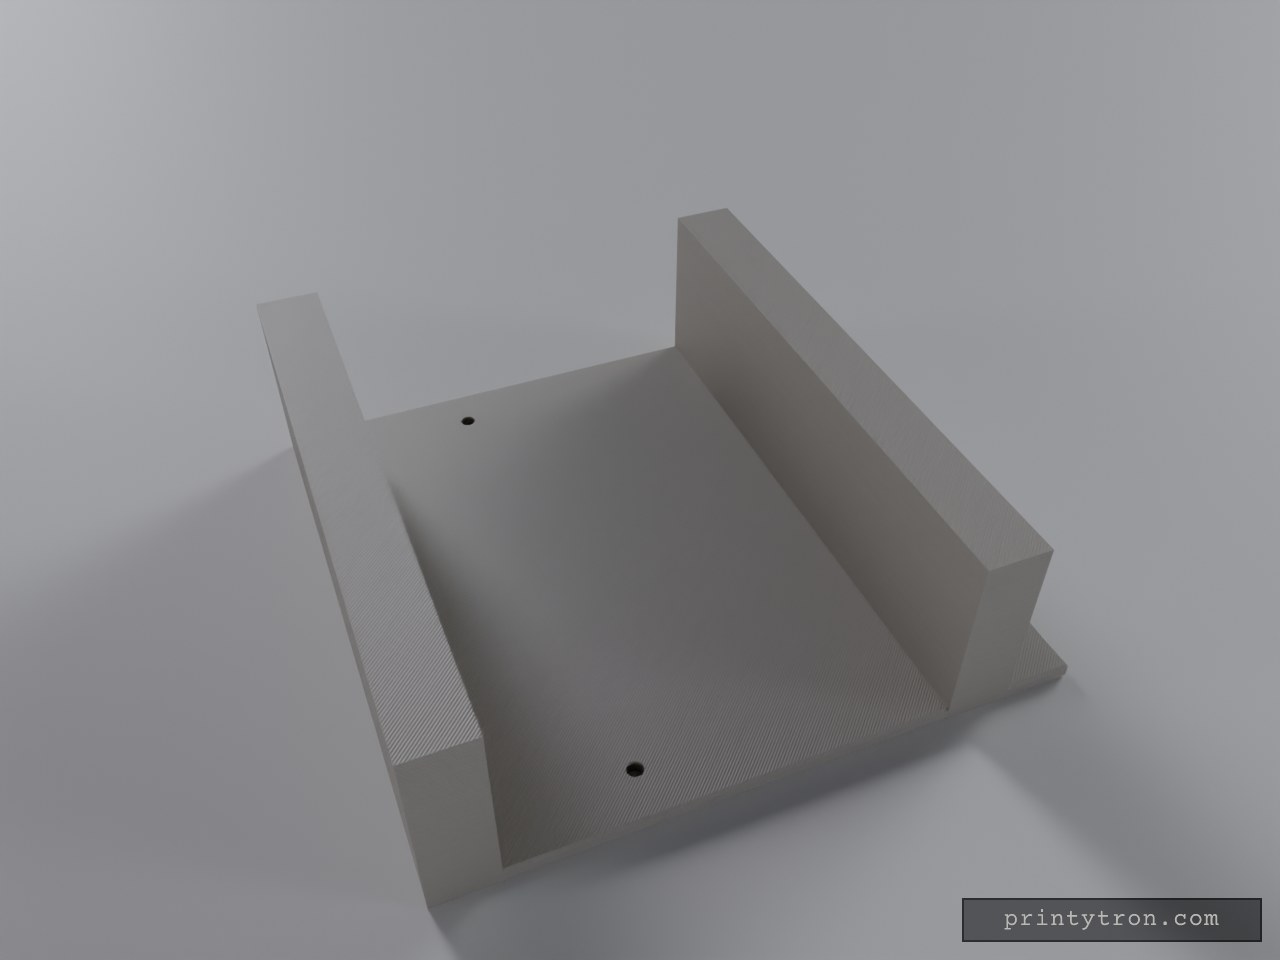
Spice Rack revA
A two-tier spice rack that mounts on the inside of a cabinet door. A flat back plate carries two shelf tiers that project forward, so jars ride on the door rather than on the cabinet shelves and the door can close over them. The upper tier sits 137 mm above the lower shelf, leaving enough height for 105 mm spice jars on the bottom shelf with roughly 14 mm of finger room once a jar is lifted over the 14 mm front lip. Specs Overall size: 175 mm wide, about 174 mm tall, 55 mm deep. Fits an 18 cm print bed. Tiers: two, set 137 mm apart. The top tier ends about 155 mm up the plate. Jar fit: each tier holds jars around 48 mm across. A 14 mm front lip and end walls keep jars in place as the door swings. Door clearance: the tiers project 55 mm from the door. Check the gap between the closed door and the cabinet shelves before printing; hinges and shelf edges can reduce it. Mounting: four countersunk 4.5 mm screw holes through the back plate, with the upper holes at 163 mm up the plate and 12 mm of plate above them. The countersink suits M3.5/#6 flat-head screws; check screw length against the door thickness so they do not break through the front face. Print orientation: back plate down with the shelves growing upward, so no supports are needed. Measure the door-to-shelf clearance and jar diameter before committing to a full print; the depth and tier spacing depend on both.
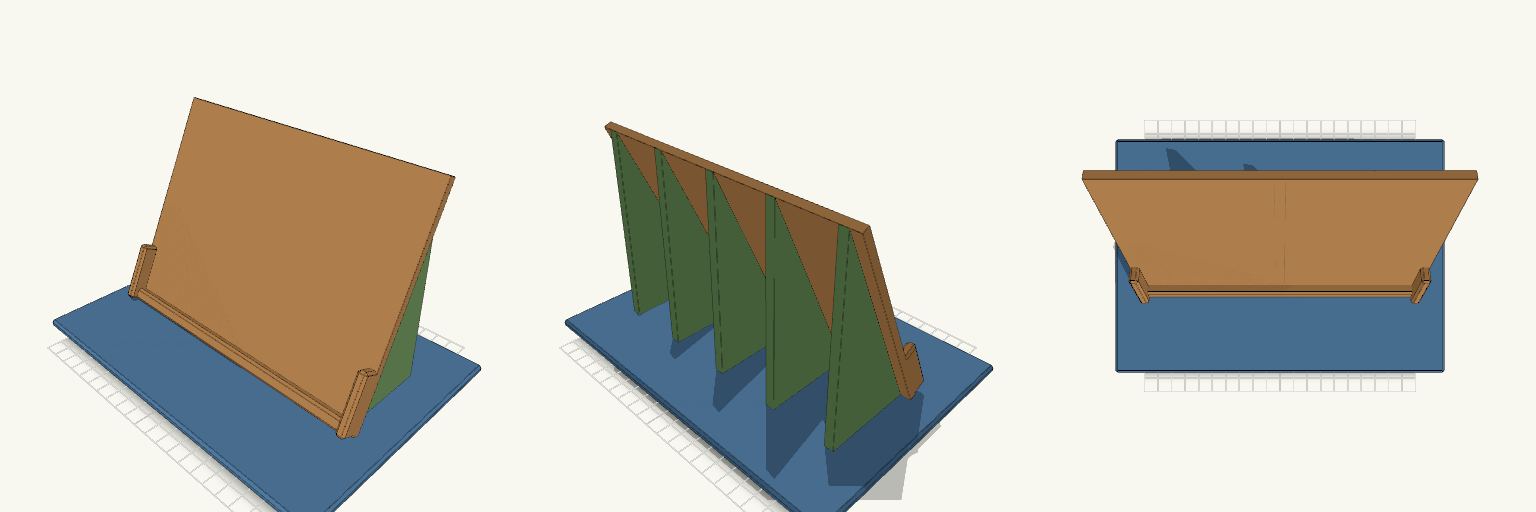
65° Kitchen Counter iPad Stand
A wide, flat iPad stand for kitchen counters. The cradle sits at 65° from horizontal, a steep reading angle for recipes while standing. The underside of the base has a shallow recess that leaves a perimeter rim, so the edge seals against the counter and crumbs and flour are less likely to creep under. What it's for Reading recipes on an iPad at standing height without bending over. Use on a kitchen counter, where the wide base resists tipping. The stopper at the bottom of the cradle holds the iPad's lower edge, and the two side tabs keep it from sliding sideways. Dimensions Base: 240 × 170 × 5 mm, with 1.5 mm chamfered edges. Underside recess: 228 × 158 mm, 1.6 mm deep, leaving a rim around the perimeter. Cradle plate: 200 × 150 × 5 mm, tilted at 65° from horizontal. Bottom stopper: 8 mm deep and 11 mm tall, measured from the plate. Side tabs: 6 mm wide, 40 mm long and 16 mm tall, one on each side. Supports: five ribs, each 6 mm thick, spaced 45 mm apart under the cradle. Overall height: about 143 mm. Print notes Print the base face-down on the bed. The underside recess then faces up and needs no supports. PETG or ASA suits a kitchen better than PLA, which softens in heat. The cradle prints as one piece with the base and ribs, so no assembly is needed. Remix ideas Add a raised lip on top of the base to catch spills. Change the tilt angle for a lower or steeper view. Narrow the cradle and tabs for a smaller tablet. Add a cable slot in the stopper for charging while reading. Stick a thin rubber or silicone pad inside the rim for extra grip.
Need a part that doesn't exist yet?
Start building →